

How to implement SAML and OIDC SSO in Remix
SSO (Single-Sign-On) allows users to sign in to multiple services with a single login. If you use Gmail, you may have noticed that you don’t need to sign into Google Drive, or Google Photos. That’s SSO making your life easier!

SSO (Single-Sign-On) allows users to sign in to multiple services with a single login. If you use Gmail, you may have noticed that you don’t need to sign into Google Drive, or Google Photos. That’s SSO making your life easier!
Imagine that you’re part of a business that has 20+ internal apps (used by various staff who all have Microsoft Azure accounts), and you’ve also just onboarded a new client that will be using only some of these apps. These apps might contain confidential information or financial data. So you want to make sure that not everyone can access every app and have the same permissions, but you also don’t want to have to manage building out authentication systems separately for each app, managing users, sending password reset emails etc. With SSO, and a tool like Descope, all your users can sign-in in one place and be logged in to all yours apps everywhere.
In this article, you will setup OIDC SSO, SAML SSO, and magic link authentication using Descope that will secure a Remix app. The app we’ll be building is an AI chat application that generates images using OpenAI’s image API - and has light/dark mode using Shadcn. Here is what the app will look like:

App Preview
Implementing authentication and SSO in Remix
Prerequisites
To follow along, you will need the following:
Setting up Descope
Creating your Account
If you don’t have a Descope account already, https://www.descope.com/sign-up. Otherwise, https://app.descope.com/login.
Creating your Descope Project
If you have just created a new account, you will be redirected to the https://app.descope.com/gettingStarted page for your new default project.
If you want to create a new project, click on your project name in the top left (next to the Descope icon) and choose + Project from the dropdown. Creating a new project will take you to the Getting Started page.
Now that you are on the Getting Started page titled: Who uses your application, choose the Business option, since this will allow us to specify tenants for our SSO implementation later. Tenants represent entities such as “your employees” or “your client’s users” as mentioned in the example in the introduction.
Next, choose Magic-Link and SSO.

Setup Options
On the page after that, choose “go ahead without MFA” as we don’t need this yet. Then click “next”. Now your project set up is complete, but you can edit the name of your project by going to Settings → Project in the sidebar on the left.
You will only be implementing and using the flow Sign up or in, so if you ever want to customize this flow, go to Build → Flows → Sign up or in.
Customizing the Descope Flow
I have provided the flow template sign-up-or-sign-in.json at the root of the Git repository. To follow along with this tutorial, you will need to import this flow by going to Build → Flows, click on Import Flow and then select the json file.

Import Flow
Creating the Remix app with authentication
In the provided repository, there are two branches: starter and master. Master is the completed project. In order to follow along with this tutorial, you must checkout the starter branch.
Once you are on the starter branch, let’s get familiar with the project. Have a look at the app/routes/_index.tsx file (which relates to our base route at http://localhost:3000) you will see https://remix.run/docs/en/main/route/loader which asynchronously loads an example image. The component that consumes the previousChat is wrapped in a https://react.dev/reference/react/Suspense, and just like that, we have data that displays in our app once it’s ready!
export async function loader() {
  return defer({
    previousChat: loadPreviousChat(),
  });
}
In the same file, we declare the React component which will use the data (via the useLoaderData hook) that is asynchronously returned by the loadPreviousChat() function above.
const { previousChat } = useLoaderData<typeof loader>();
const actionData = useActionData<ActionData>();
const hasImageResult =
  actionData && "imageUrl" in actionData && actionData.imageUrl;

return (
  <SidebarProvider>
    {isClient && <AppSidebar />}
    <SidebarInset className="flex flex-col">
      <Header />
      <div className="flex flex-1 flex-col items-center justify-end p-4 pt-0">
        <div className="w-full max-w-3xl mx-auto">
          <PreviousExampleChatSession previousChatPromise={previousChat} />
          {hasImageResult && ...
You will also notice in the above code that the app/components/nav/app-sidebar.client.tsx (AppSidebar) component is only rendered if isClient is true. This browser-only rendering logic is important, and you will use it later to render the app/components/auth/auth-wrapper.client.tsx
In this same app/routes/_index.tsx file there is a Remix action that will hit the OpenAI api and generate an image with the user’s prompt.
export async function action({ request }: ActionFunctionArgs) {
  const formData = await request.formData();
  const prompt = formData.get("prompt") as string;

  if (!prompt) {
    return json<ActionData>({ error: "Prompt is required" });
  }
  // ...
This action is called by a button inside the chat-command-menu.tsx, inside a Form element. By default in Remix, a button with type="submit" inside a Form, will send a HTTP POST to the action defined for that route. If you specify the “action” prop on the Form, it will use a different action. See resources.theme-toggle.tsx for an example of this.
This makes submitting data and forms really simple, but unfortunately it isn’t typed. You will see in the above code, that in order to access the prompt that the user submitted, you will have to access the value by typing in the name of key as a string and casting the result to string.
const prompt = formData.get("prompt") as string;
However, given how simple useLoaderData() makes managing state with Remix - this is easy to forgive.
What isn’t so simple, is securing this application so we can get real people using it with their own private AI chats…
Setting up Descope Authentication in Remix
Now it’s time to use the sign-up-or-sign-in.json flow that you imported into Descope earlier in our Remix application.
First, go to https://app.descope.com/settings/project and copy the Project ID. Then in your .env file in the repository, add PUBLIC_DESCOPE_PROJECT_ID={your_project_id}.
Then install:
npm i --save @descope/react-sdk
Next, you will need to create the AuthWrapper component. This component displays the 3 different views our user will see depending on whether they are logged in, not logged in, or Descope is loading their session. Create a file at app/components/auth/auth-wrapper.client.tsx and paste in the below code:
import { AuthProvider, useSession, useUser, Descope } from "@descope/react-sdk";
import { Outlet } from "@remix-run/react";
import { toast } from "~/hooks/use-toast";

export function AuthWrapper({ children }: { children: React.ReactNode }) {
  return (
    <AuthProvider projectId={window.ENV.PUBLIC_DESCOPE_PROJECT_ID ?? ""}>
      <AuthInner>
        <Outlet />
      </AuthInner>
    </AuthProvider>
  );
}

function AuthInner({ children }: { children: React.ReactNode }) {
  const { isAuthenticated, isSessionLoading } = useSession();
  const { isUserLoading } = useUser();

  return (
    <>
      {!isAuthenticated && (
        <div className="flex items-center justify-center min-h-screen bg-gray-100 dark:bg-gray-900 transition-colors">
          <div className="w-full max-w-md p-6 bg-white dark:bg-gray-800 rounded-lg shadow-md dark:shadow-gray-700">
            <Descope
              flowId="sign-up-or-in"
              onSuccess={(e) => console.log(e.detail.user)}
              onError={(e) =>
                toast({
                  title: "Could not log in!",
                  description: "Please try again.",
                  variant: "destructive",
                })
              }
            />
          </div>
        </div>
      )}

      {isAuthenticated && (isSessionLoading || isUserLoading) && (
        <div className="flex items-center justify-center min-h-screen bg-gray-100 dark:bg-gray-900 transition-colors">
          <div className="w-full max-w-md p-6 bg-white dark:bg-gray-800 rounded-lg shadow-md dark:shadow-gray-700 text-center">
            <p className="text-gray-700 dark:text-gray-300">Loading...</p>
          </div>
        </div>
      )}

      {isAuthenticated && !isSessionLoading && !isUserLoading && <Outlet />}
    </>
  );
}
Now you will need to change the app/root.tsx file: First add these imports to the top of the file.
import { AuthWrapper } from "./components/auth/auth-wrapper.client";
import { isClient } from "./lib/utils";
Change the environment variable in the loader (PUBLIC_DESCOPE_PROJECT_ID) so it will load your Descope project ID in into the client:
export const loader = async ({ request }: LoaderFunctionArgs) => {
  return json({
    requestInfo: {
      hints: getHints(request),
      userPrefs: {
        theme: getTheme(request),
      },
    },
    ENV: {
      PUBLIC_DESCOPE_PROJECT_ID: process.env.PUBLIC_DESCOPE_PROJECT_ID,
    },
  });
};
The last thing to do in this file is scroll down to where you see <Outlet/> and replace it with:
{isClient && (
  <AuthWrapper>
    <Outlet />
  </AuthWrapper>
)}
Now you will need to update the app/components/nav/app-sidebar.client.tsx so that this client-side navbar will load the user information from Descope once you have logged in.
Add this import to the file:
import { useUser } from "@descope/react-sdk";
Replace this user declaration starting on line 44:
const user = {
  userId: "123",
  email: "[email protected]",
  name: "Example User",
  picture: "NA",
};
with the user that is obtained from the Descope useUser() hook:
const { user } = useUser();
The last thing to do is implement the logout functionality. Go to the app/components/nav/nav-user.client.tsx and add this import:
import { useDescope } from "@descope/react-sdk"
On line 38, add this code:
const { logout } = useDescope()
const handleLogout = useCallback(() => {
  logout()
}, [logout])
The DropdownMenuItem near the bottom of the file currently has an empty/stub onClick event handler:
<DropdownMenuItem onClick={() => {}} className="flex items-center gap-2 text-destructive focus:text-destructive">
  <LogOut className="size-4" />
  <span>Log out</span>
</DropdownMenuItem>
Change this so that we use the new handleLogout function:
<DropdownMenuItem onClick={handleLogout} className="flex items-center gap-2 text-destructive focus:text-destructive">
  <LogOut className="size-4" />
  <span>Log out</span>
</DropdownMenuItem>
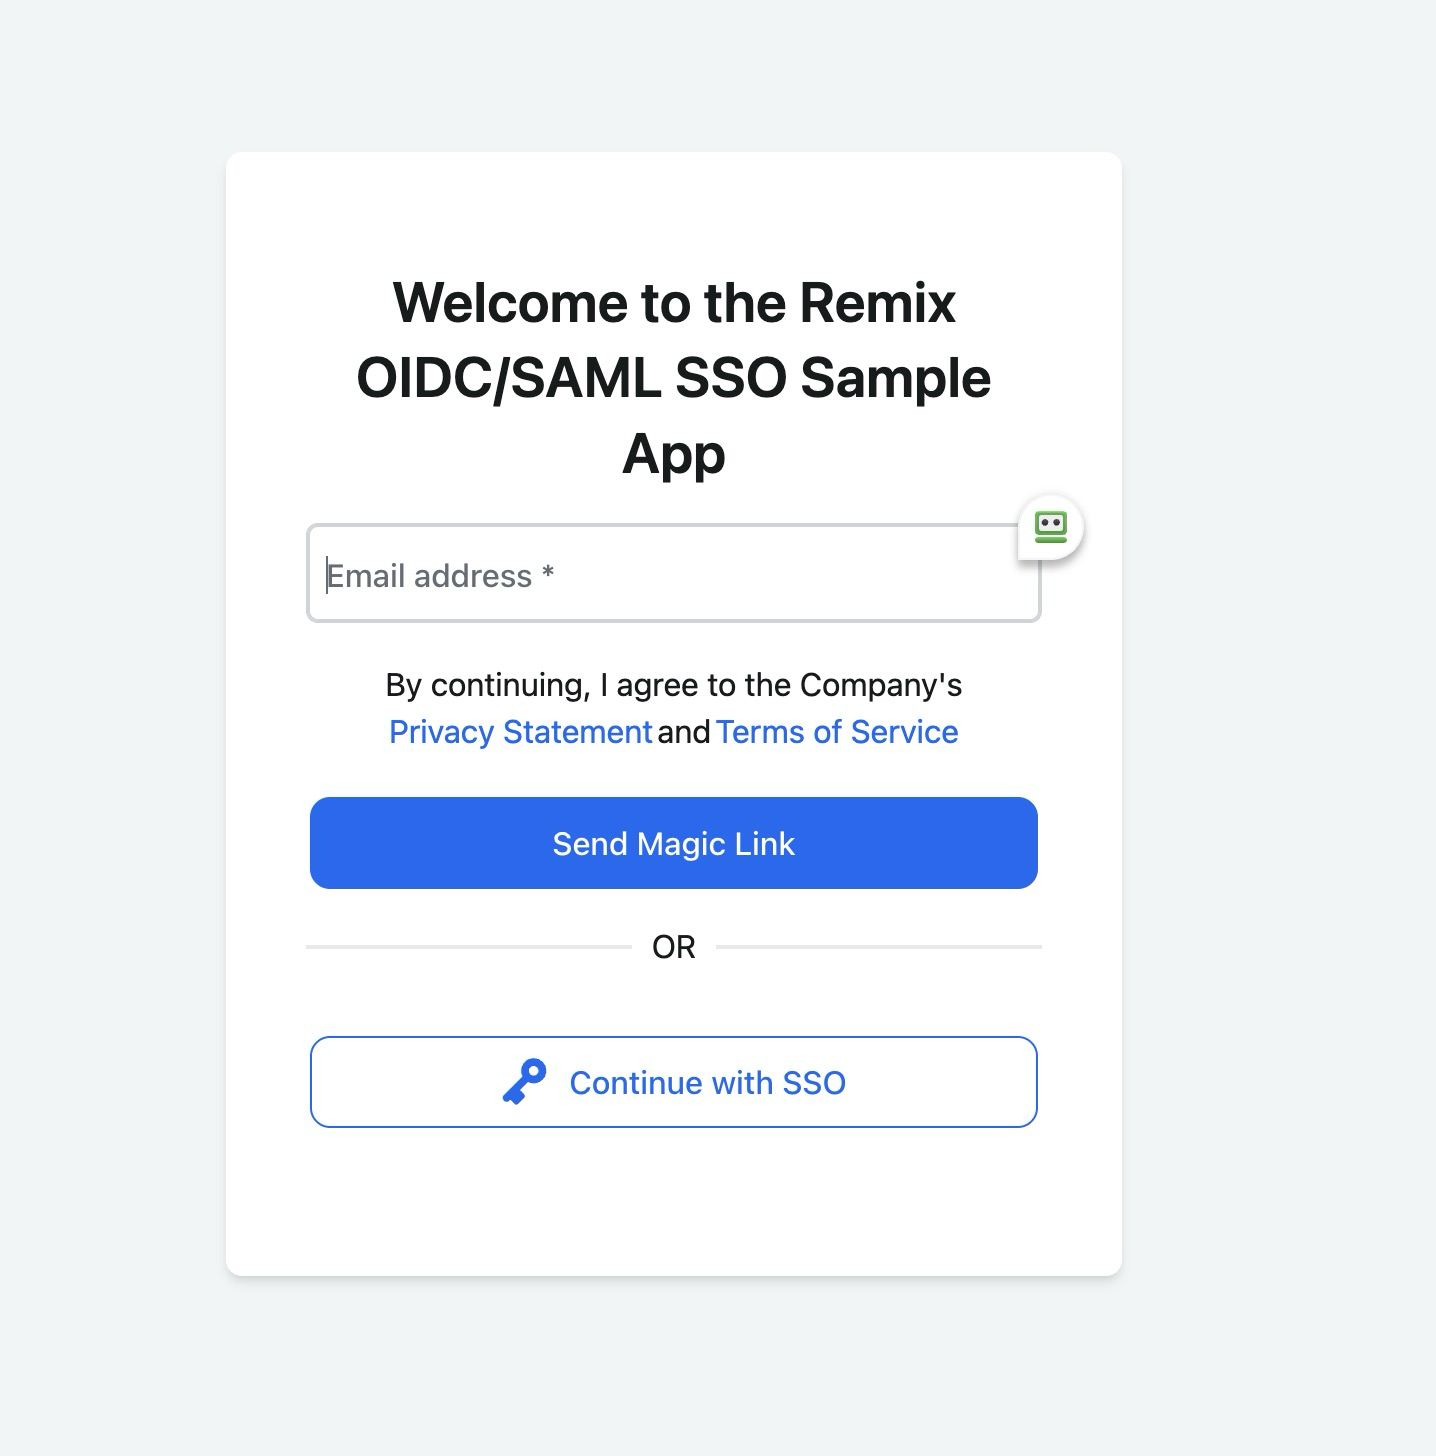
That’s it! If you startup the app now, it will display the Descope Welcome screen.

Descope Welcome Screen
You can now sign in with a magic link, and the home screen will display your user information in the bottom left.
Lastly, if you want to access the token that Descope has provided your browser (after authenticating), you can access it like so. This example is from https://docs.descope.com/getting-started/react/nodejs:
import { getSessionToken } from '@descope/react-sdk';

const App = () => {
  const { isAuthenticated, isSessionLoading } = useSession()
  const { user, isUserLoading } = useUser()

  const exampleFetchCall = async () => {
    const sessionToken = getSessionToken();
    // Example Fetch Call with HTTP Authentication Header
    fetch('your_application_server_url', {
      headers: {
        Accept: 'application/json',
        Authorization: 'Bearer ' + sessionToken,
      }
    })
  }
  // ...
Then, you can pass it in headers to your backend, or whatever else you may need to use it for. Thereafter, it can be verified using the Descope package for your backend. For instance, with Node.js install:
npm i --save @descope/node-sdk
This is out of the scope of this tutorial, but you can read more at: https://docs.descope.com/getting-started/react/nodejs
Adding OIDC SSO with Descope and Azure
If you logout now, and try to login using the Continue with SSO button, you will notice it fails.
This is because, we need to setup a tenant for SSO in Descope, and then configure the application in Azure.
We are using Azure for this tutorial, but remember this could be done in Okta, Google Cloud etc.
Creating an application in Azure
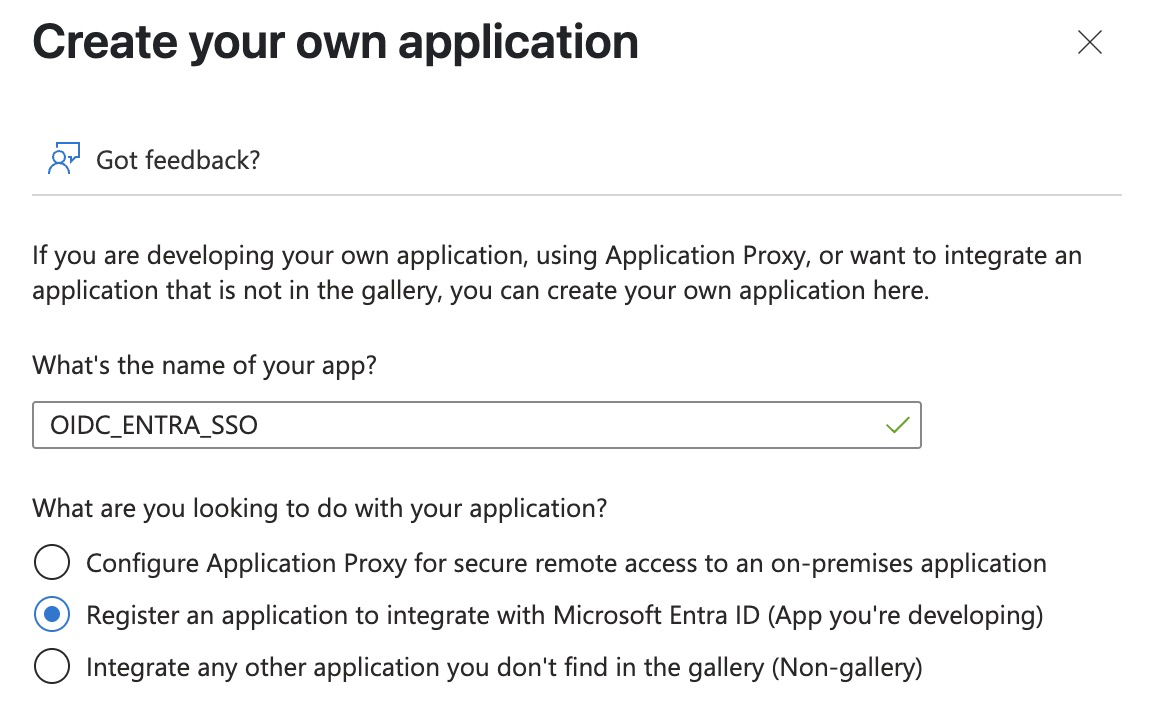
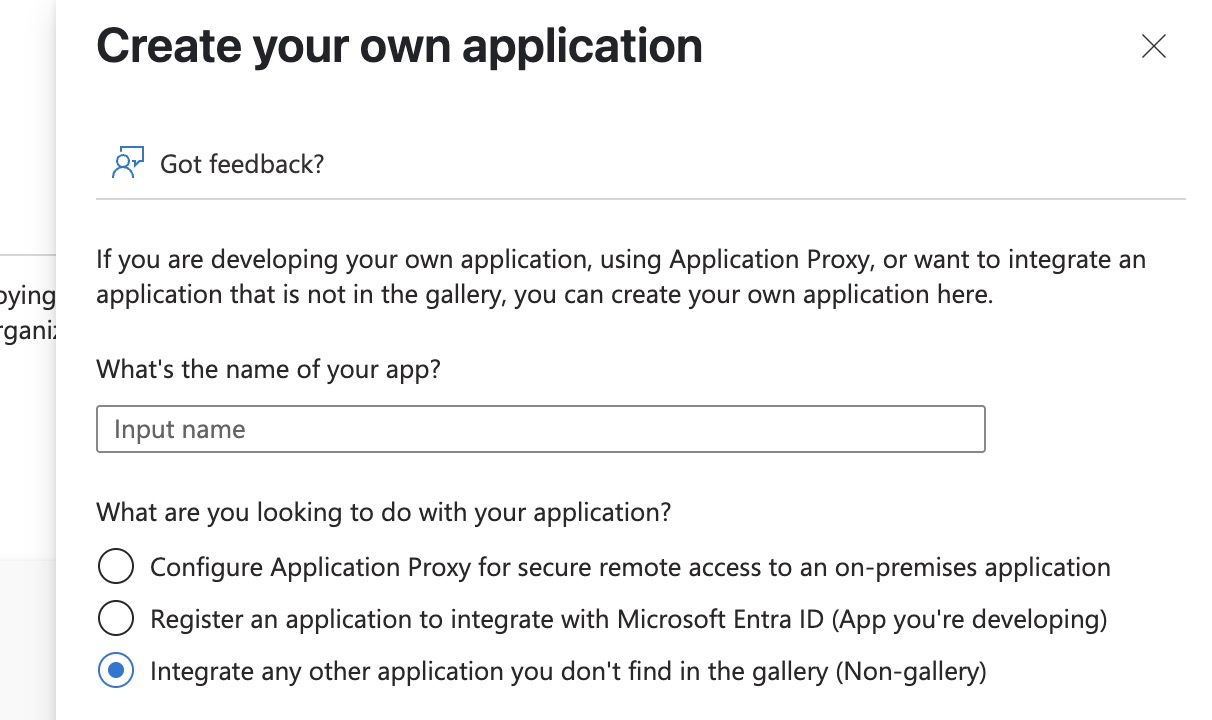
Navigate to https://portal.azure.com/#view/Microsoft_AAD_IAM/AppGalleryBladeV2 to create a new application in Azure. Then click “Create your own application” in the top left, enter the name of the app and be sure to check the 2nd option as per below.

Azure App Creation
On the following page, set the redirect uri as https://api.descope.com/v1/oauth/callback. Then go to the https://portal.azure.com/#view/Microsoft_AAD_RegisteredApps/ApplicationsListBlade and click on the app you just created. Then go to the Overview tab, and copy the Application (client) ID. Go to Manage → Certificates & Secrets, then create a new client secret and copy the value.
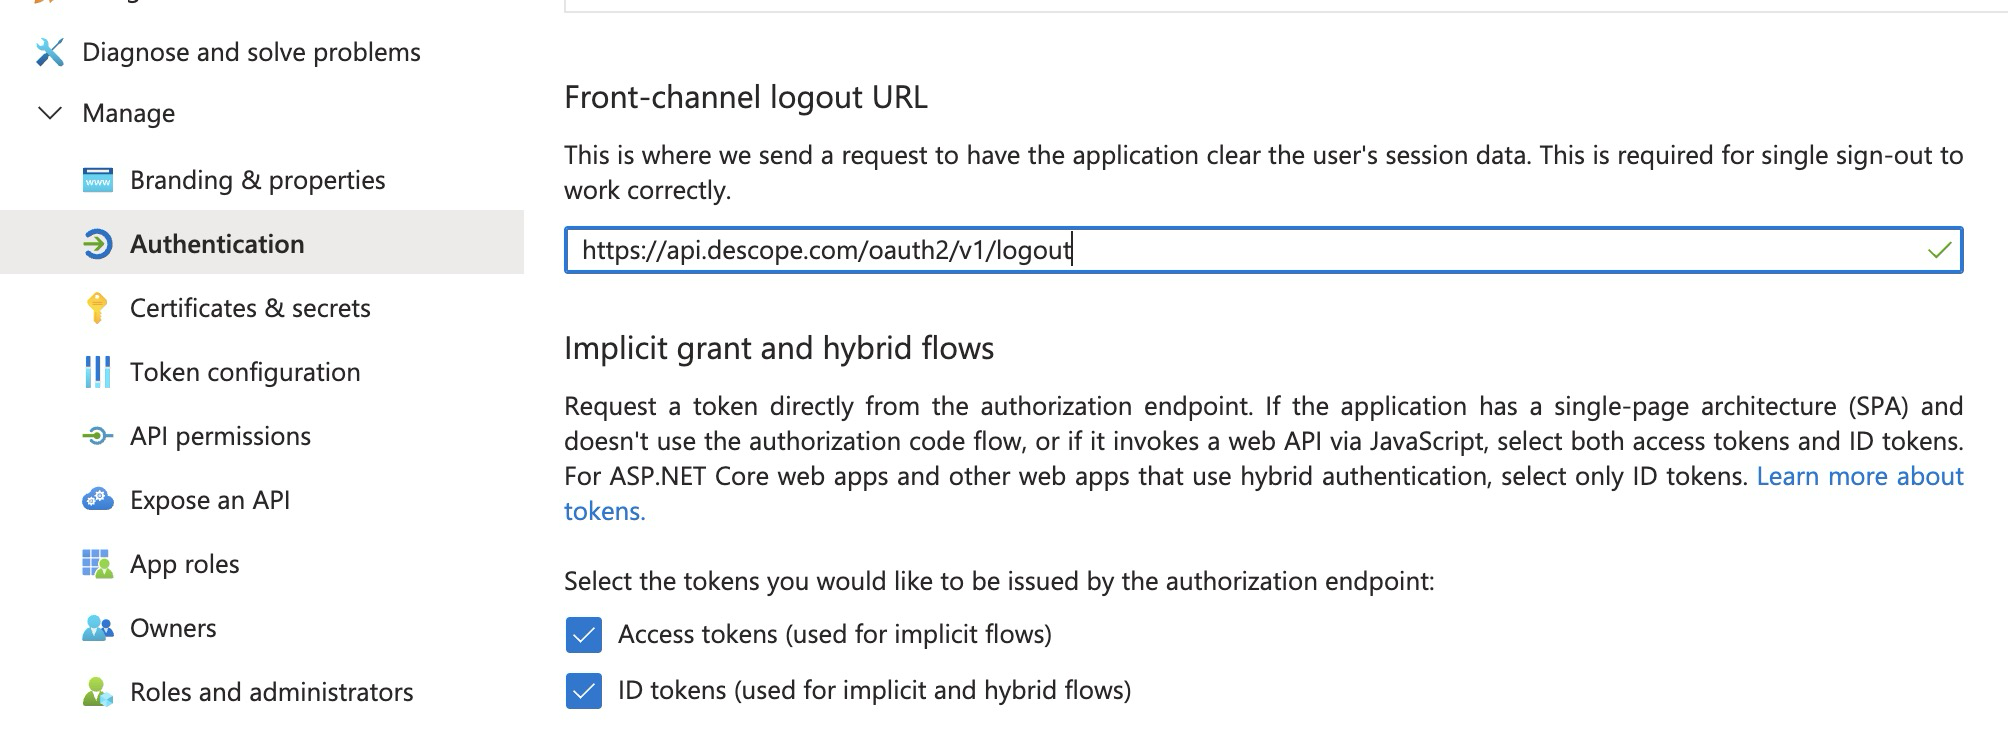
Now that you’ve stored the Client ID and client secret, go to the Authentication tab directly above Certificates & Secrets, and check the 2 checkboxes - for access and ID tokens respectively. Then paste “https://api.descope.com/oauth2/v1/logout” into the Front-channel logout URL.

Azure Authentication Settings
Now we have set up the app in Azure for our first tenant, but we don’t have the tenant modelled in Descope, so let’s create it.
Make the Descope Tenant
Go to https://app.descope.com/tenants and click the plus to create a new tenant.
Then navigate to the SSO page as indicated below, and select OIDC (Note - you can have OIDC and SAML enabled for a single tenant - so you could follow through this whole tutorial (with minor changes) and use the same tenant in Descope but different tenants in Azure.

Descope SSO Configuration
Now scroll down to SSO Configuration and enter in this information under Account Settings:
- Provider Name: Azure
- Client ID: The application (client) ID you saved earlier
- Client Secret: The secret you saved earlier
- Scope:
openid profile email - Grant Type: leave as
Authorization code
To fill in the Connections Settings section underneath, you will need to head back to your app in Azure. Go the the Overview page again, and click on Endpoints tab at the top.
Fill in the following two inputs under Connections Settings in Descope using the value from the corresponding section in Azure:
- Authorization Endpoint: The value under: OAuth 2.0 authorization endpoint (v2)
- Token Endpoint: The value under: OAuth 2.0 token endpoint (v2)
Then, open the link under OpenID Connect metadata document in a new tab, and check “pretty print” so you can see the fields easier.
Now, you can fill in the last fields in Descope using the information on this page:
- Issuer: the value to the right of issuer in the json
- User Info Endpoint: the value for userinfo_endpoint
Time to Test
Now you can head back to the Remix app and make sure you’re logged out. Then click Sign in with SSO after entering the email associated with the domain of this new tenant you just configured.
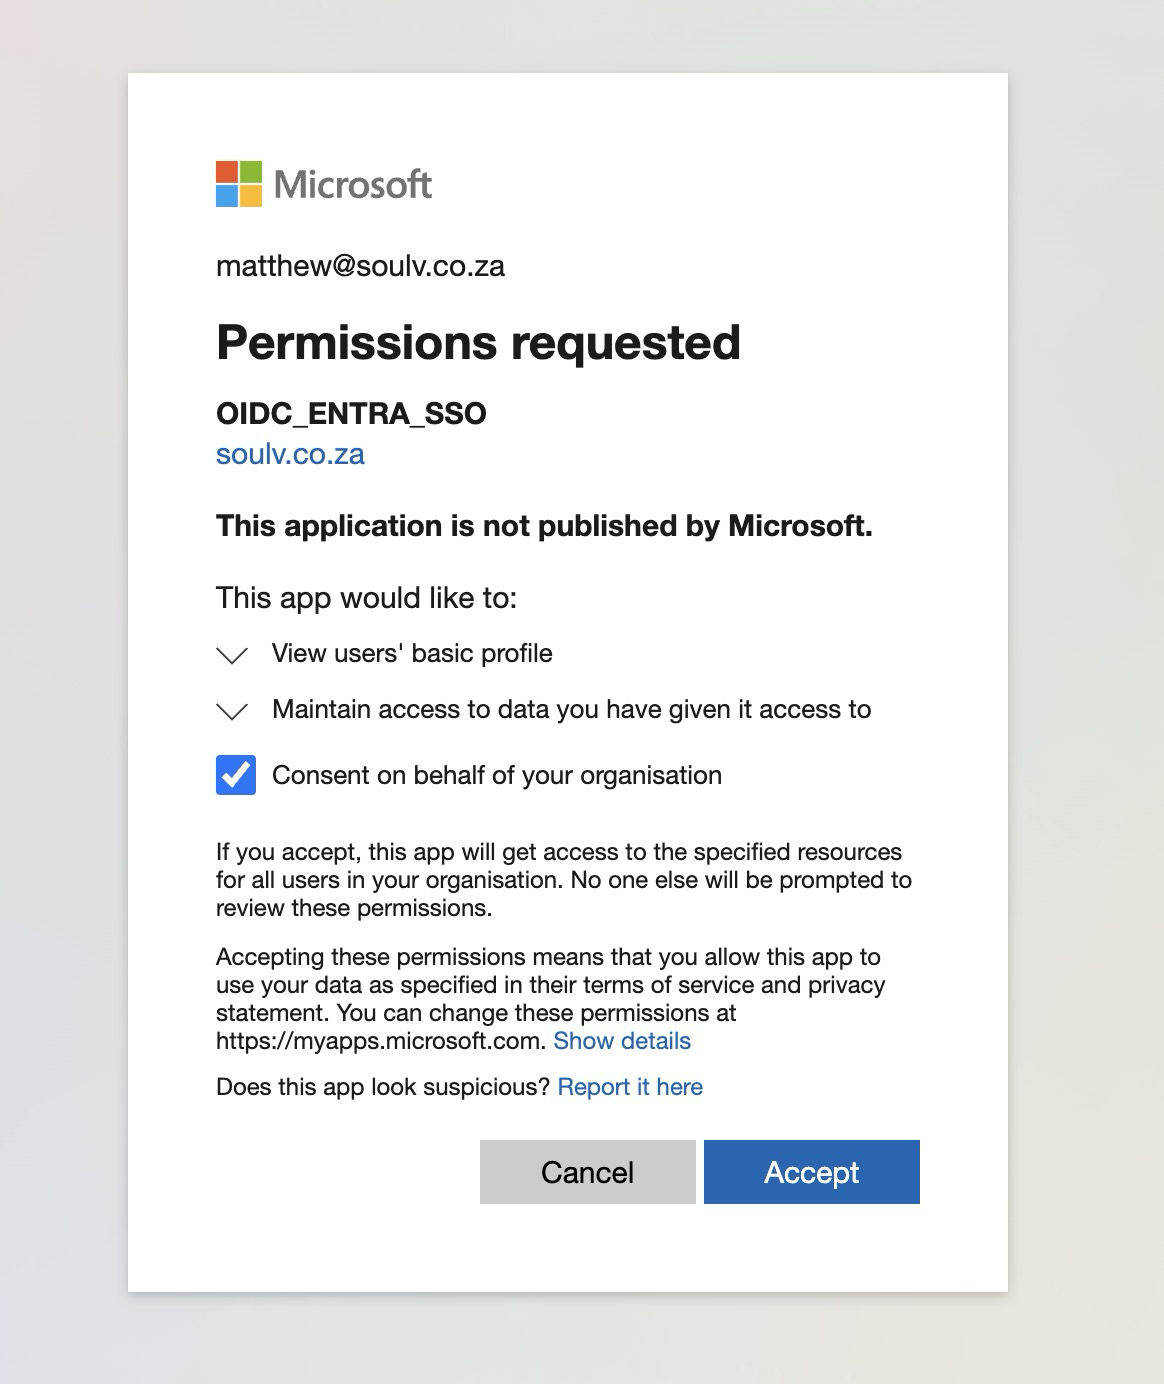
If prompted, you will need to accept as per below:

Azure SSO Consent
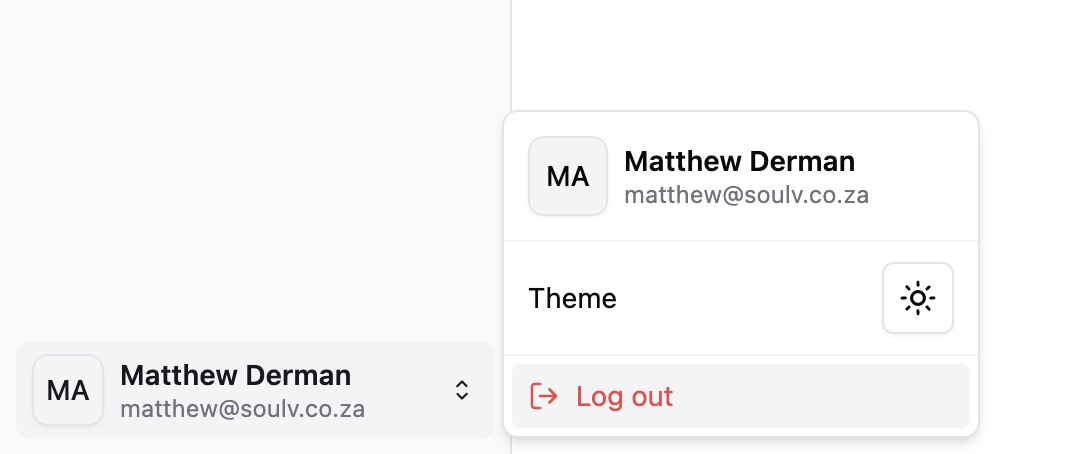
Now you will see your user in the sidebar, and so we’ve added OIDC SSO successfully!

Successful SSO Login
Adding SAML SSO with Descope and Azure
In order to create a new SAML app within Azure, you may want to create a new tenant. This is because domains are bound to the tenant, so we can’t have users at different domains with the same tenant within Azure. Here’s how to create a new tenant.
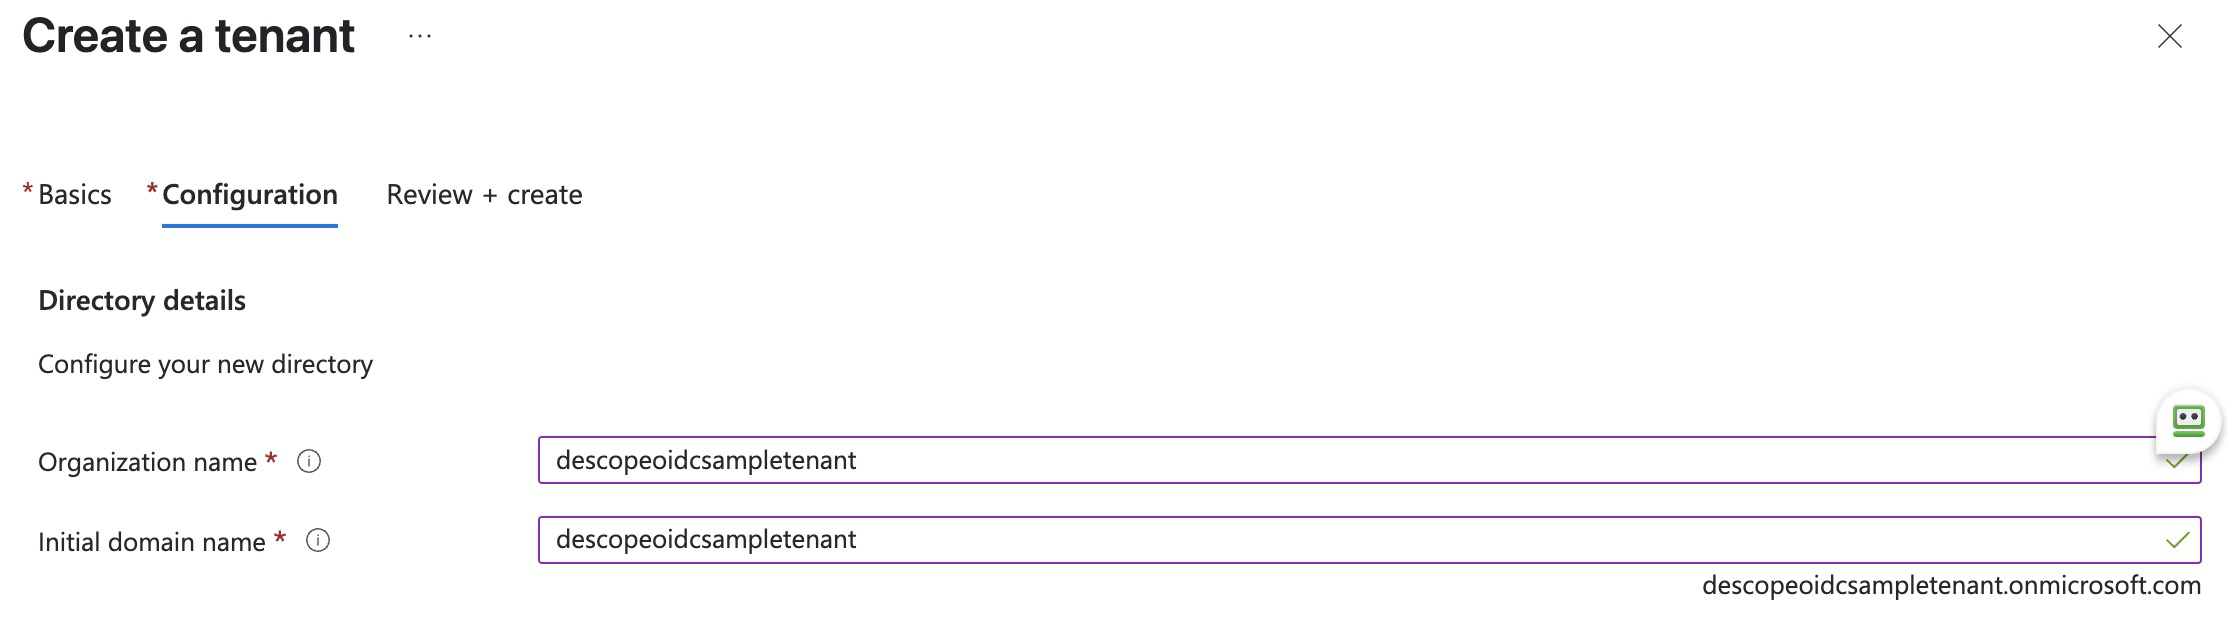
Navigate to https://portal.azure.com/#view/Microsoft_AAD_IAM/DirectorySwitchBlade/subtitle/ and create a new tenant to use for this example. Choose Microsoft Entra External Id under Basics, and then enter your organization and domain name. Here is what I will be entering for this example:

Azure Tenant Creation
Click Create, and switch to the tenant in the top right. Now you can create an application as per before with the OIDC SSO implementation, by going to your https://portal.azure.com/#view/Microsoft_AAD_IAM/AppGalleryBladeV2, except choose the 3rd option after entering a name for your tenant.

SAML App Registration
Go back to Descope and create a new tenant as per the OIDC section above. Remember, we need to make a tenant for each separate source/grouping of users. In this example I am imagining the tenant represents your employees, and the other tenant you created in Descope earlier representing users for one of your clients.
Go to the SSO page as per before (after selecting your new tenant here) https://app.descope.com/tenants, but enable SAML not OIDC. Now enter the domain for this tenant under SSO Domains within Tenant Details at the top of this page.
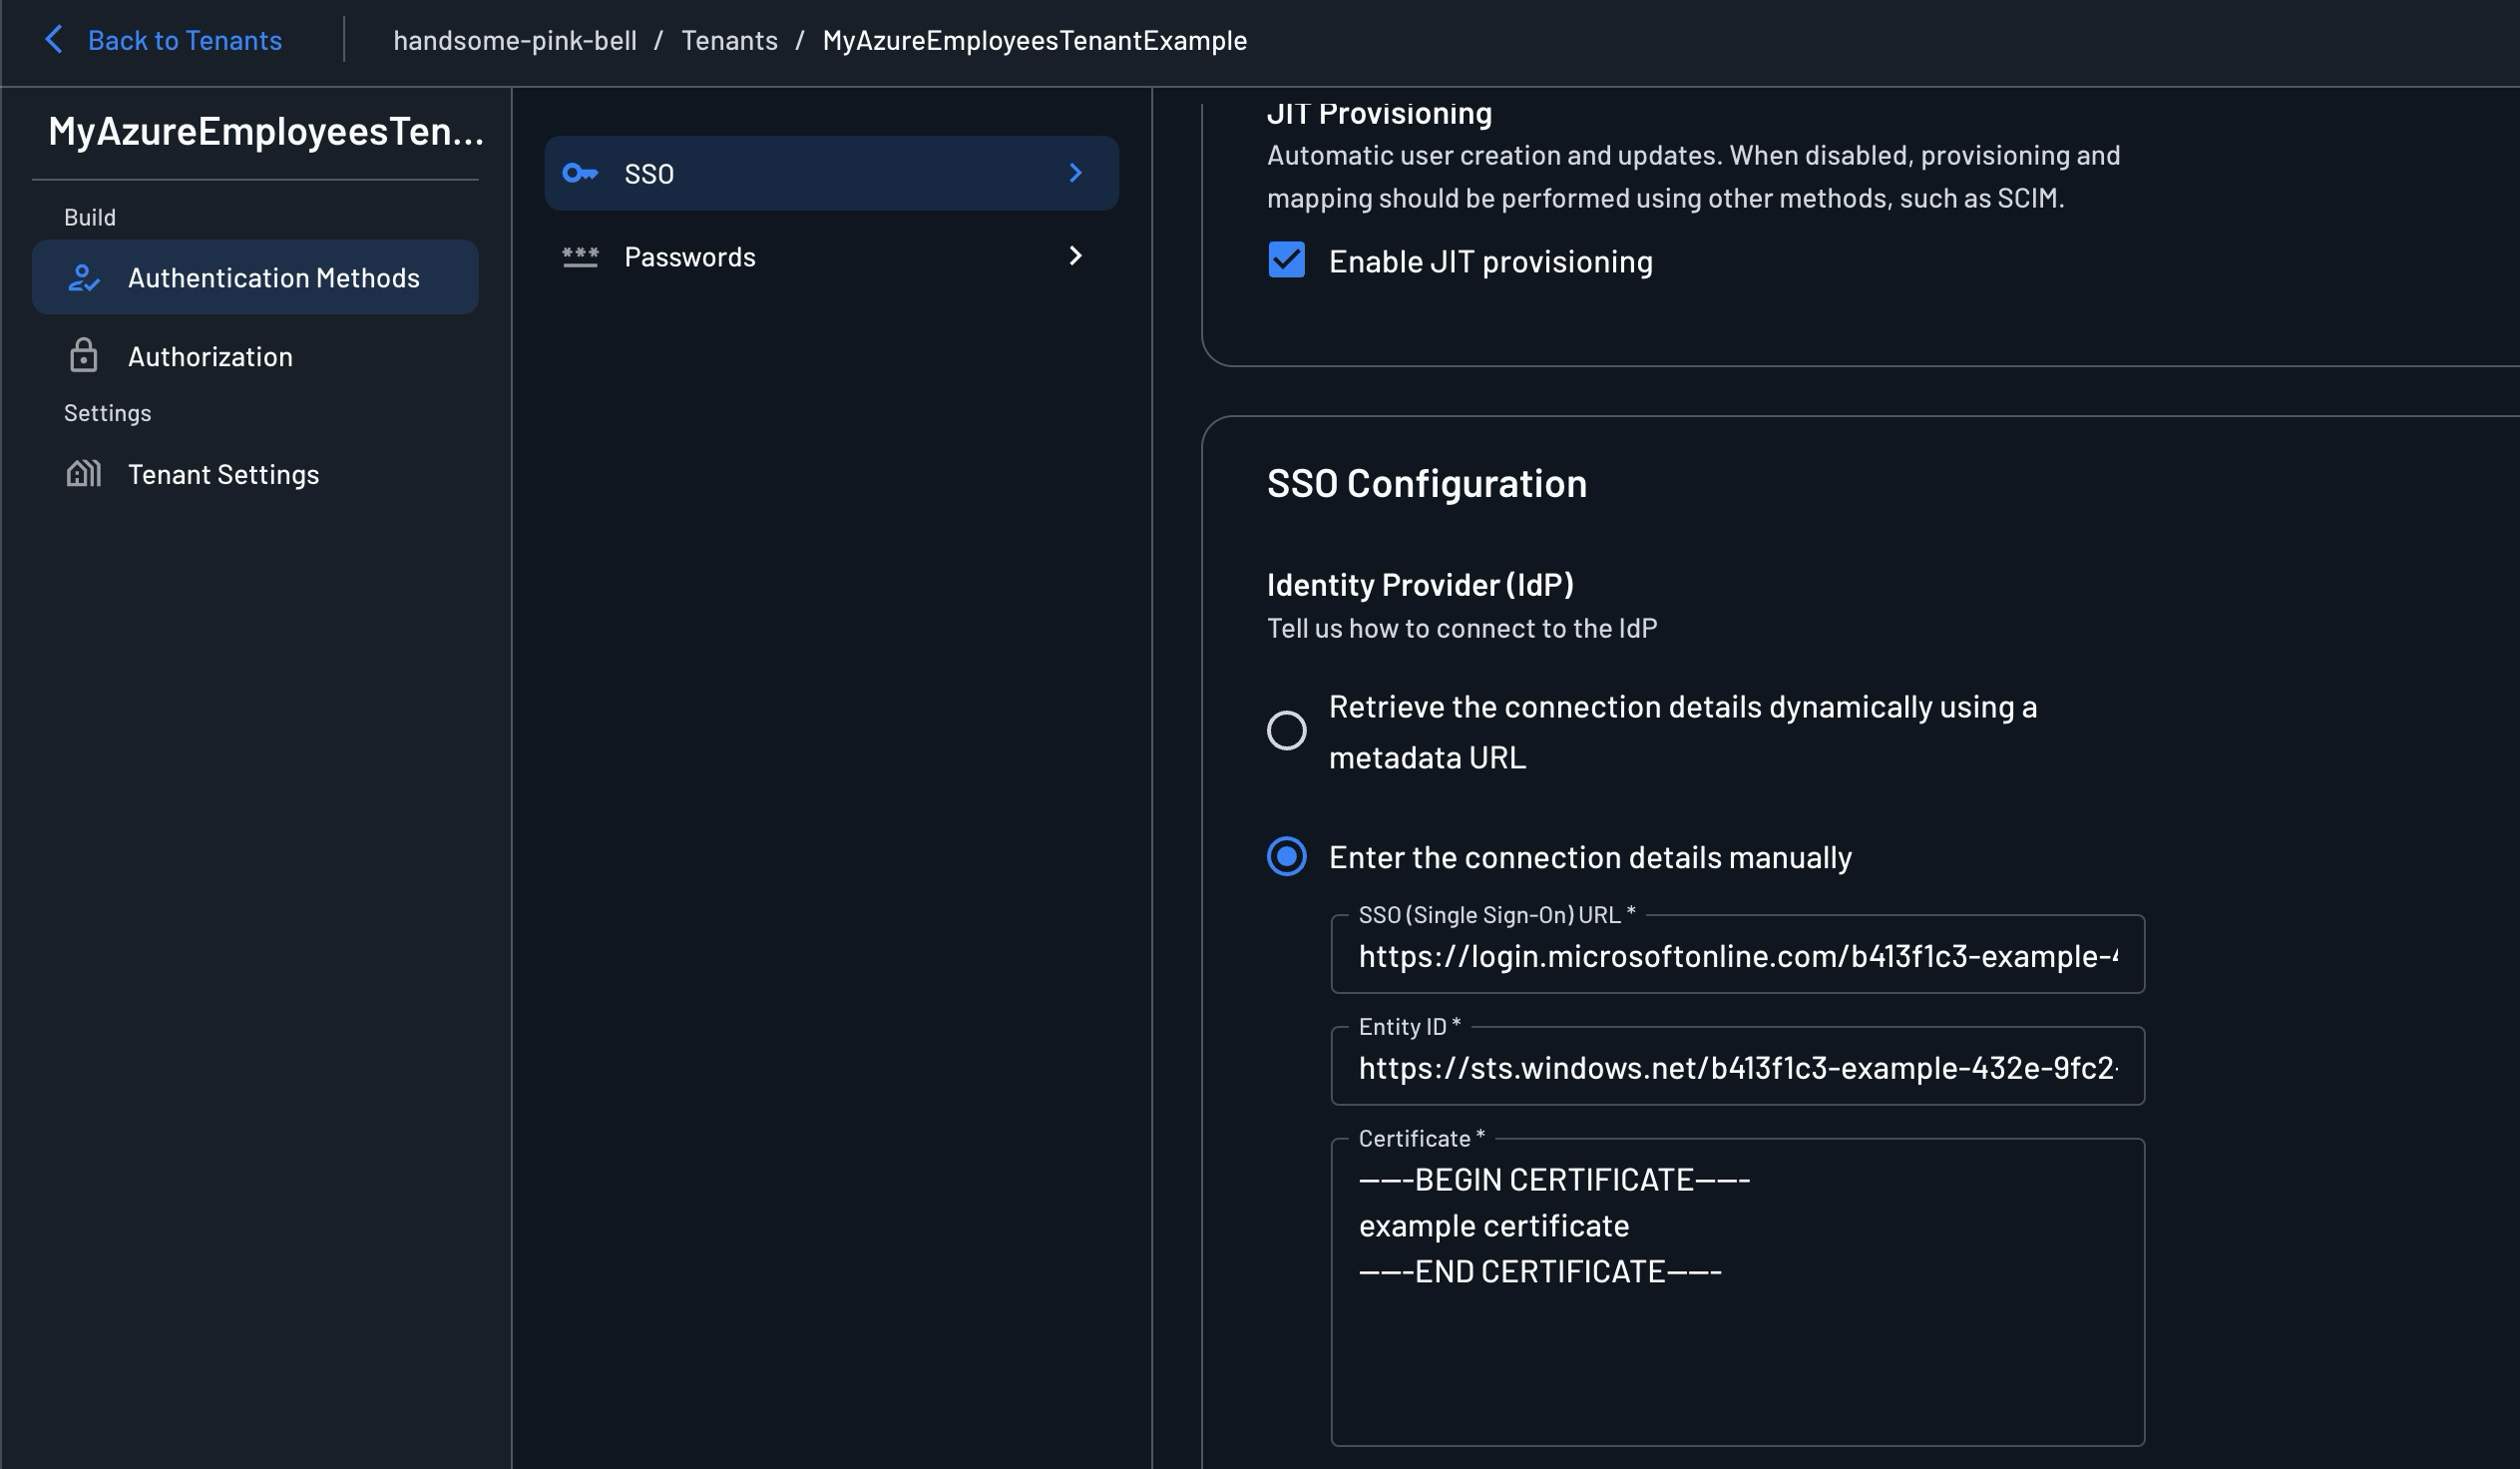
Scroll down to SSO Configuration. Then check Enter the connection details manually. Here’s what it will look like once you have entered all the information after the next few steps:

SAML Configuration
To enter in that information pictured above that will allow Descope to connect to Azure, head back to the app registration in Azure. Go to Manage → Users and Groups → + Add user/group. Then click on the none selected option. Then select whatever users you want assigned to this tenant.
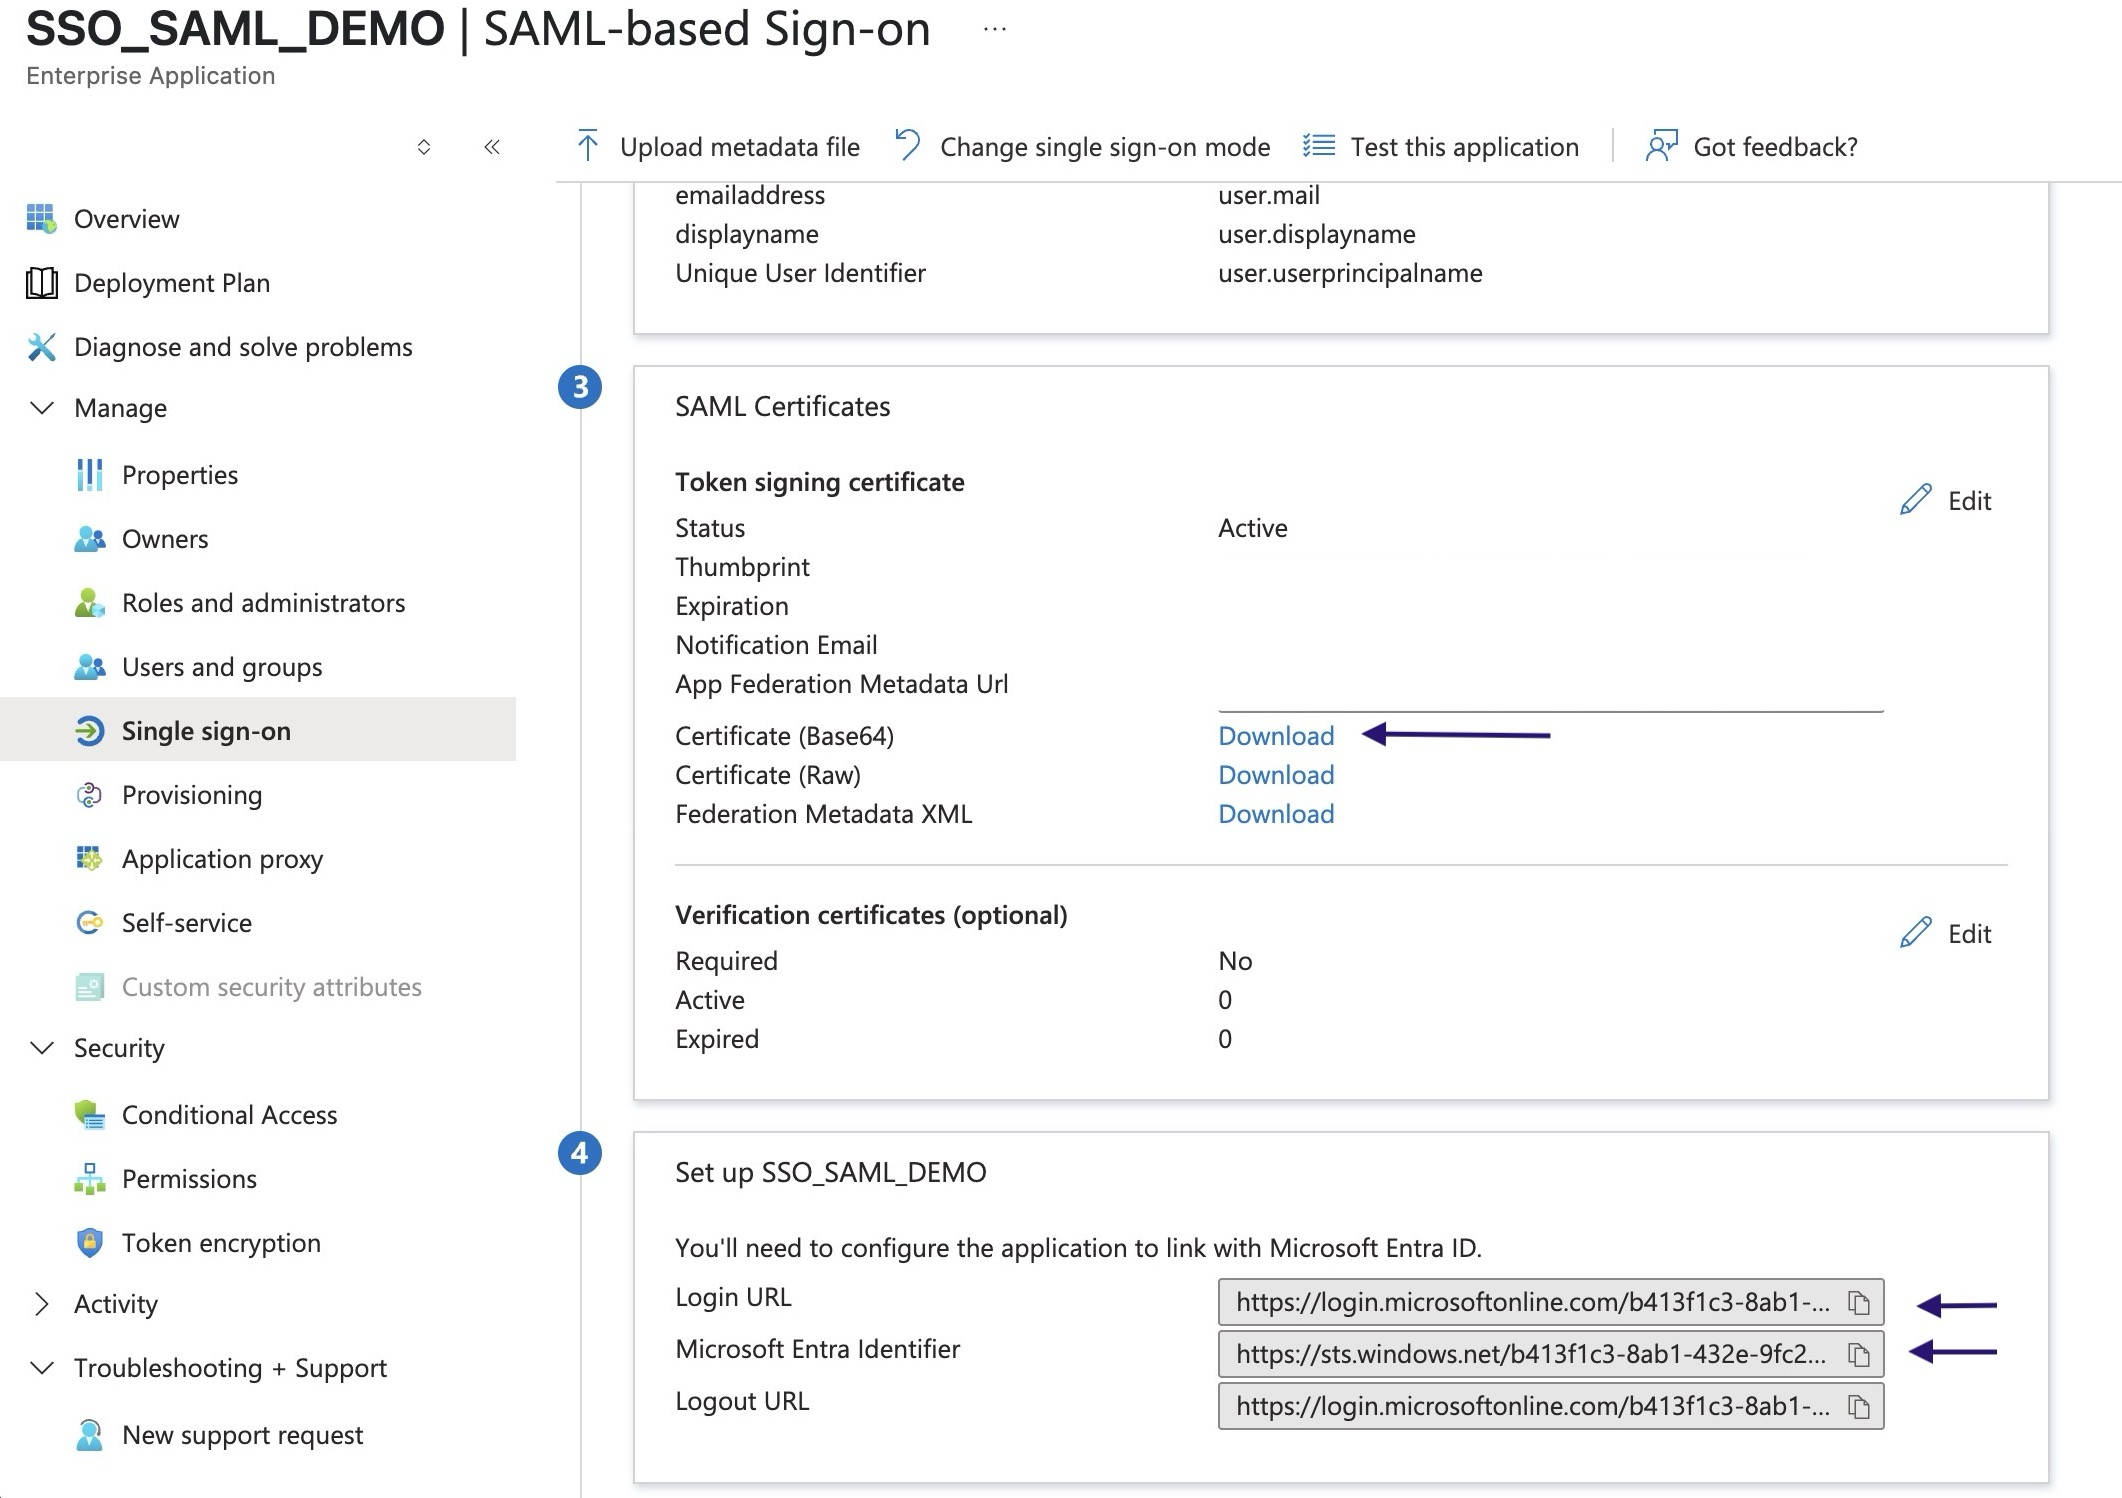
Now go to Manage → Single sign-on, and choose SAML. Scroll down to section 4. Then copy the values for Login Url, and Microsoft Entra Identifier, and paste them into the respective sections in Descope:
- SSO (Single Sign-On) URL: Login Url
- Entity ID: Microsoft Entra Identifier

SAML URLs
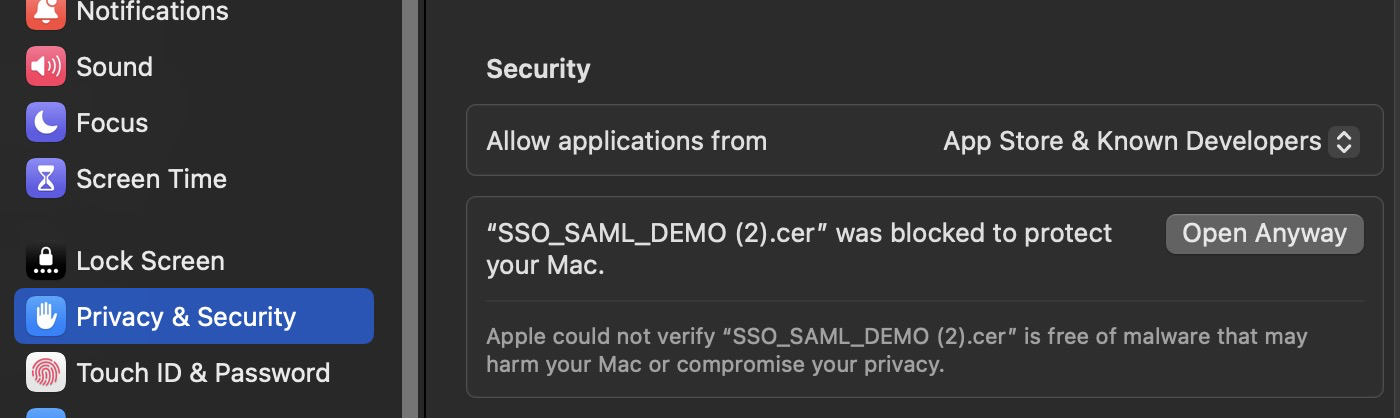
Now you need to enter the Certificate in Descope. Go back to the Single sign-on page in Azure, and click download next to Certificate (Base64) in section 3. Open this file in a text editor. If you’re on a Mac, you may need to head to Settings → Privacy and Security, and scroll down to Security and check “Open Anyway”. Then copy the text and paste it into the Certificate input in Descope.

Certificate Download
Finally, scroll down in Descope to the section under Service Provider. Go back to Azure, and scroll back up to section 1 on this same page, and click on Edit:
- For: Identifier (Entity ID) paste in the value for Descope Entity ID (not required by all providers) from Descope
- For: Reply URL (Assertion Consumer Service URL) paste in the value copied from Descope ACS URL in Descope
SSO Mapping for SAML SSO
The last thing we need to do is SSO mapping, this will ensure that Descope and our app can access attributes we might care about for our users - for example: assigned groups, roles, name, email etc. The SAML protocol does not contain something like a user info endpoint (like we provided earlier with OIDC) so we need to map this manually.
Go back to the Single sign-on page under Manage (that you were on earlier) and click Edit under section 2 (Attributes & Claims). Ensure that you have at least the below claims:

SAML Claims
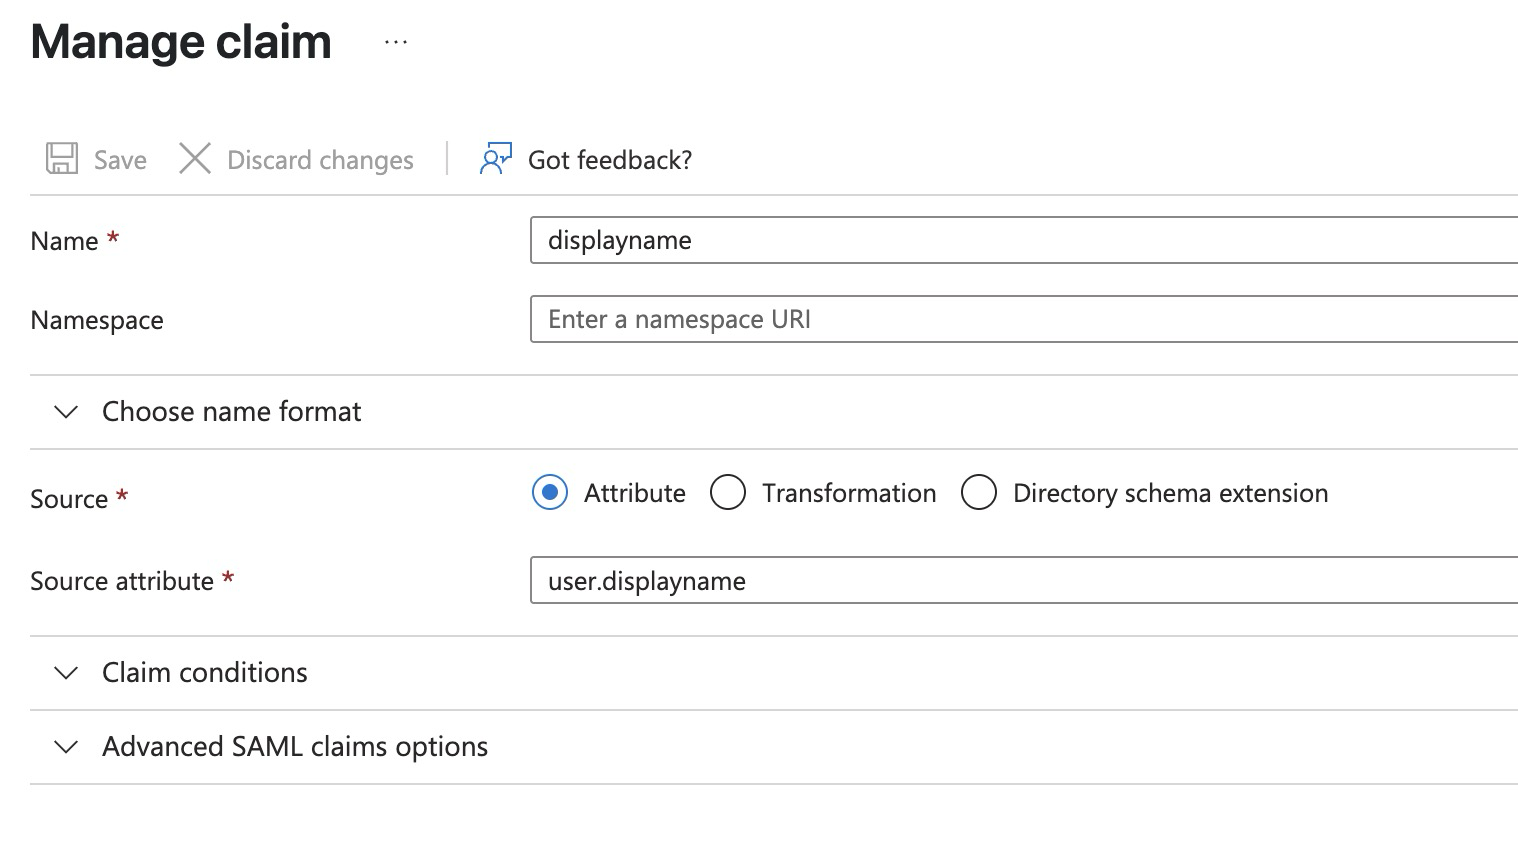
For instance, this is how the displayname claim would look like when clicking edit:

Display Name Claim
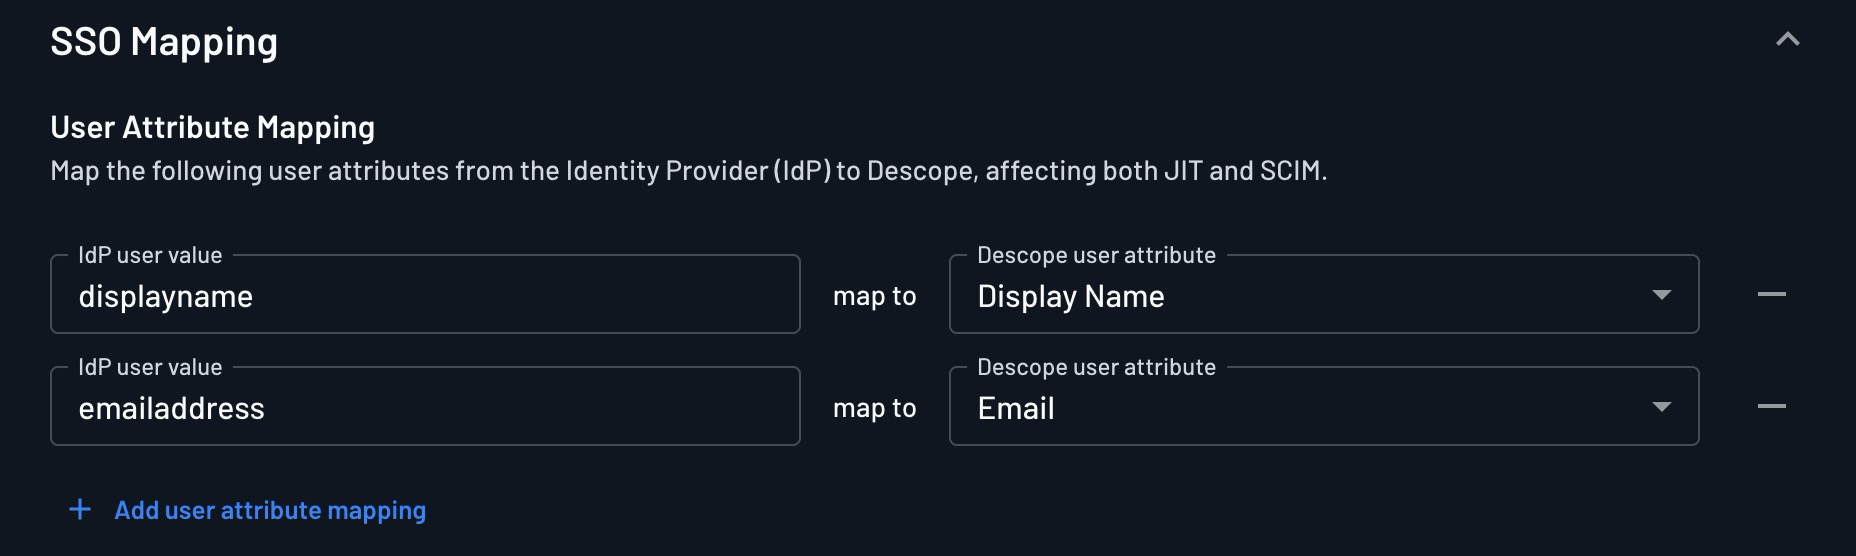
Go back to Descope, and scroll down on the same SSO page until you reach the section for SSO Mapping. Enter these two mappings:

SSO Mapping
Testing Time
Now you can login with SSO in the Remix app again, but make sure to use a user you have selected for this new tenant. If you see your name in the bottom left in the Remix app after logging in, you can be sure that the SSO mapping and other SAML configuration you entered was correct!
Optionally, you can head to https://app.descope.com/users and click edit on a user to confirm it was assigned to the correct tenant after logging in.
Conclusion
After reading this article, you should have a good understanding of:
- Why SSO is useful (and what it is)
- Securing pages (and possibly other APIs) in your Remix app
- How to configure app registrations in Azure for OIDC and SAML
- How to configure Remix for OIDC, SAML and magic link login
We have also explored the Descope Flow editor just enough for you to get a grasp of what is possible, and how you could begin to string together more advanced flows (think asking the user for MFA confirmation, filling out forms before signing up, the list goes on).
Descope’s SSO functionality has allowed you to centralize authentication, streamlining the authentication process for your users, while also allowing you to later manage roles and other authorization properties for your users all in one place. All of this functionality without you needing to implement SAML, OIDC / OAuth protocols into your app directly - saving you vast amounts of time and security concerns.
OLD
If you’ve spent more than an hour setting up authentication in your Remix app, you’re doing it wrong.
You’ve got more than enough experience.
The issue is that there’s too much information out there and you just need to choose a single plan to follow.
By the end of this article, you will have setup authentication using SSO, SAML SSO, and magic links in your Remix application using Descope. The app we’ll be building is a chat application that generates images using OpenAI’s image API - and has light/dark mode using Shadcn. But first, here’s why all of this matters:
What is SSO (and why does it matter)?
SSO (Single-Sign-On) allows users to sign in to multiple services with a single login. Think about how you use Google’s apps. Login to Gmail and you’re logged in to Google Drive as well!
Here’s an example. Imagine you’re part of a business that has 20 internal apps (used by various staff who all have Microsoft Azure accounts), and you’ve also just onboarded a new client that will be using only some of these apps.
These apps might contain confidential information, financial data or provide the ability to transfer funds. So you want to make sure that not everyone can access every app and have the same permissions, but you also don’t want to have to manage building out authentication systems separately for each tool, managing users, sending password reset emails etc. There is a lot you’d need to do.
With SSO, all these apps will depend on one tool (in this case, Descope), and within Descope we can manage different tenants (your new client, and your employees). They can all sign-in in one place and be logged in everywhere.
SSO can be achieved through different protocols.
We will be focusing on OAuth and SAML - these enable SSO.
While the terminology differs for each protocol, Descope will provide our application with the information we need to know whether a request is by an authenticated user - and be certain that they are who they say they are! Descope stores a cookie at *.descope.com (when on the web) that allows users to be authenticated across any number of applications your business or app might need.
We will also be enabling Magic Link authentication with Descope. This emails your user’s a link that they can click on to login with - which is great for allowing users to quickly trial your app while still limiting the features they have access to.
So SSO is really useful, here’s how you’d implement it in a Remix application.
Implementing authentication and SSO in Remix
Prerequisites
- A Descope Account → head to https://www.descope.com/sign-up
- Access to an https://azure.microsoft.com/en-gb/pricing/purchase-options/azure-account/search?ef_id=_k_Cj0KCQjwiqbBBhCAARIsAJSfZkbPqqH63kylaOQt0iSh7_hbsS8kT2yVUS4iZCG2OnMJaRmGJqnnrbQaAh3-EALw_wcB_k_&OCID=AIDcmmck5pq7og_SEM__k_Cj0KCQjwiqbBBhCAARIsAJSfZkbPqqH63kylaOQt0iSh7_hbsS8kT2yVUS4iZCG2OnMJaRmGJqnnrbQaAh3-EALw_wcB_k_&gad_source=1&gad_campaignid=11536760771&gbraid=0AAAAADcJh_smxvm94j9U4aToDyPCGhSfp&gclid=Cj0KCQjwiqbBBhCAARIsAJSfZkbPqqH63kylaOQt0iSh7_hbsS8kT2yVUS4iZCG2OnMJaRmGJqnnrbQaAh3-EALw_wcB
- Npm and Git installed.
- To follow along, you will need access to https://github.com/MDerman/RemixAuthDescope.
First, what are we building?
As mentioned above, we will be securing a basic chat application that generates images with OpenAI’s API.
If you would like to follow along with this tutorial - here is the example app we’ll be building before adding authentication: LINK
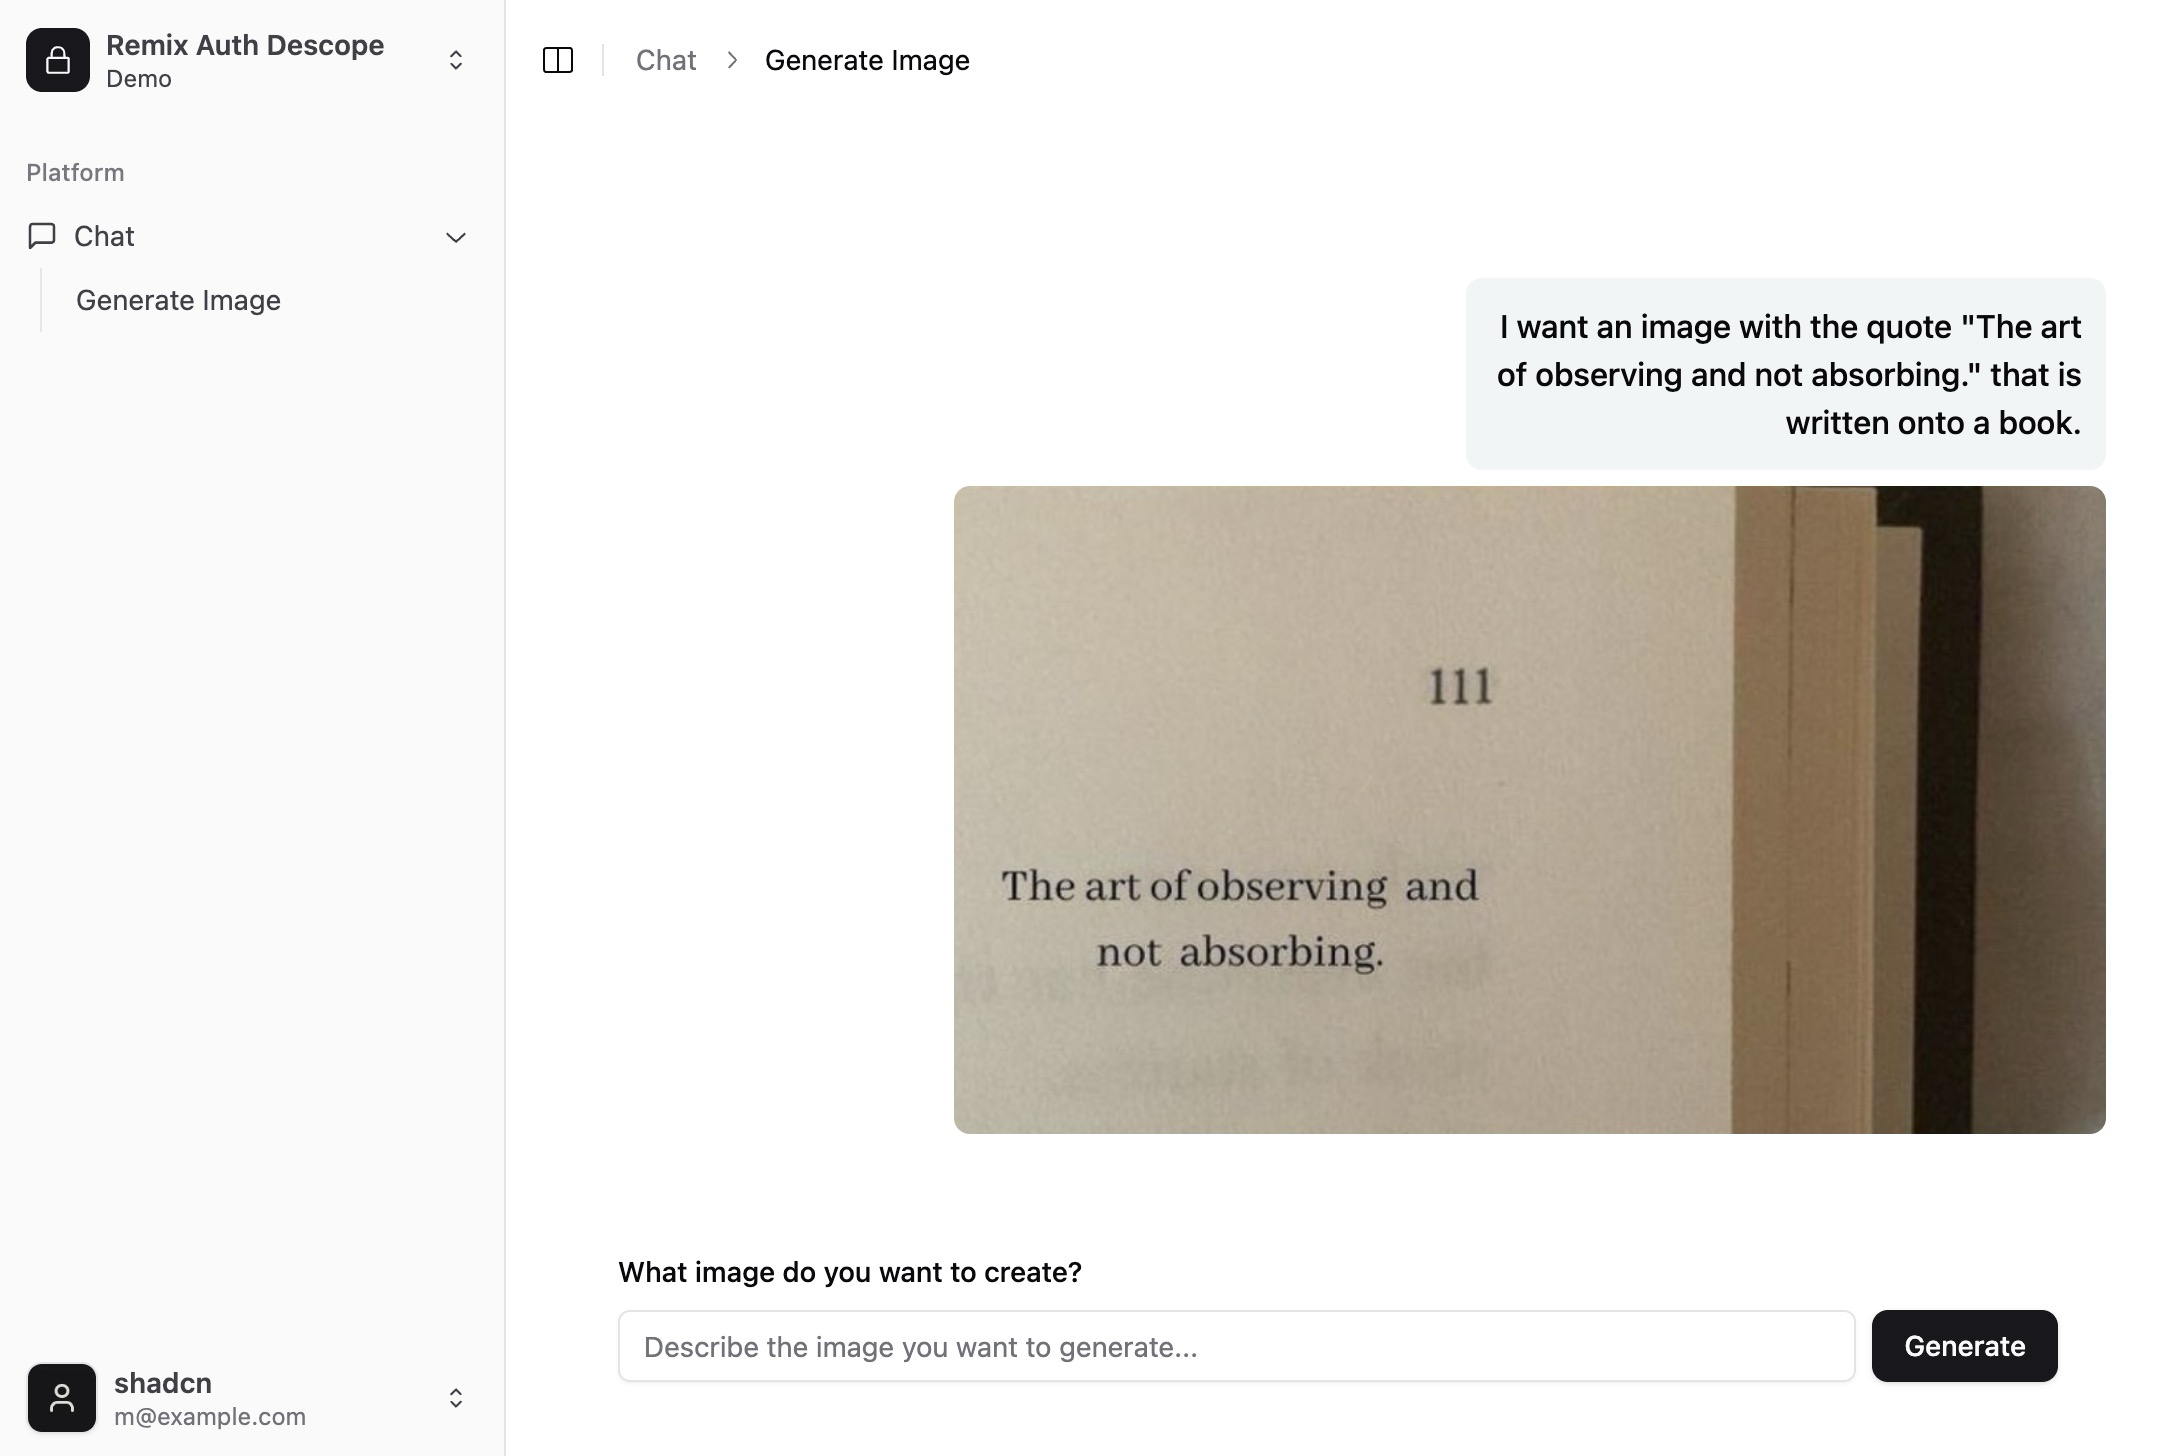
(This project was started from: https://github.com/rajeshdavidbabu/remix-shadcn-starter.git So clone that repo or any of the official examples from https://github.com/remix-run/examples/tree/main if you want to follow along from a more barebones beginning)
A bit about Remix
In the _index.tsx file (which relates to our base route at http://locahost:3000) you will see a Remix loader is declared which asynchronously loads the example image.
export async function loader() {
  return defer({
    previousChat: loadPreviousChat(),
  });
}
In the same file, we declare the client-side (running in the browser) react component which will use the data (via the useLoaderData hook) that is asynchronously returned by the loadPreviousChat() function above.
export default function Page() {
  const { previousChat } = useLoaderData<typeof loader>();

  return (
    <SidebarProvider>
      <AppSidebar />
      <SidebarInset className="flex flex-col">
        <Header />
        <div className="flex flex-1 flex-col items-center justify-end p-4 pt-0">
          <div className="w-full max-w-3xl mx-auto">
            <PreviousExampleChatSession previousChatPromise={previousChat} />
            ...
That component that consumes the previousChat is wrapped in a https://react.dev/reference/react/Suspense, and just like that, we have data that display in our app once it’s ready!
Lastly, in this same _index.tsx file there is an action that will generate the image.
export async function action({ request }: ActionFunctionArgs) {
  const formData = await request.formData();
  const prompt = formData.get("prompt") as string;

  if (!prompt) {
    return json<ActionData>({ error: "Prompt is required" });
  }
...
This action is called by a button inside the chat-command-menu.tsx, inside a Form element. By default in Remix, a button with type="submit" inside a Form, will send a HTTP POST to the action defined for that route. If you specify the “action” prop on the Form, it will use a different action. See resources.theme-toggle.tsx for an example of this.
This makes submitting data and forms really simple, but unfortunately it isn’t typed. You will see above, that in order to access the prompt that the user submitted, I have to access the value by typing in the name of key as a string and casting the result to string.
const prompt = formData.get("prompt") as string;
However, given how simple useLoaderData() makes managing state with Remix - this is easy to forgive. What isn’t so simple, is securing this application so we can get real people using it with their own private chats…
Setting up Descope
- Go to: https://app.descope.com/login
- Who uses’s your application → Business (we need to choose Business - as this will allow us to specify tenants for our SSO implementation later)
- Then choose Magic-Link and SSO
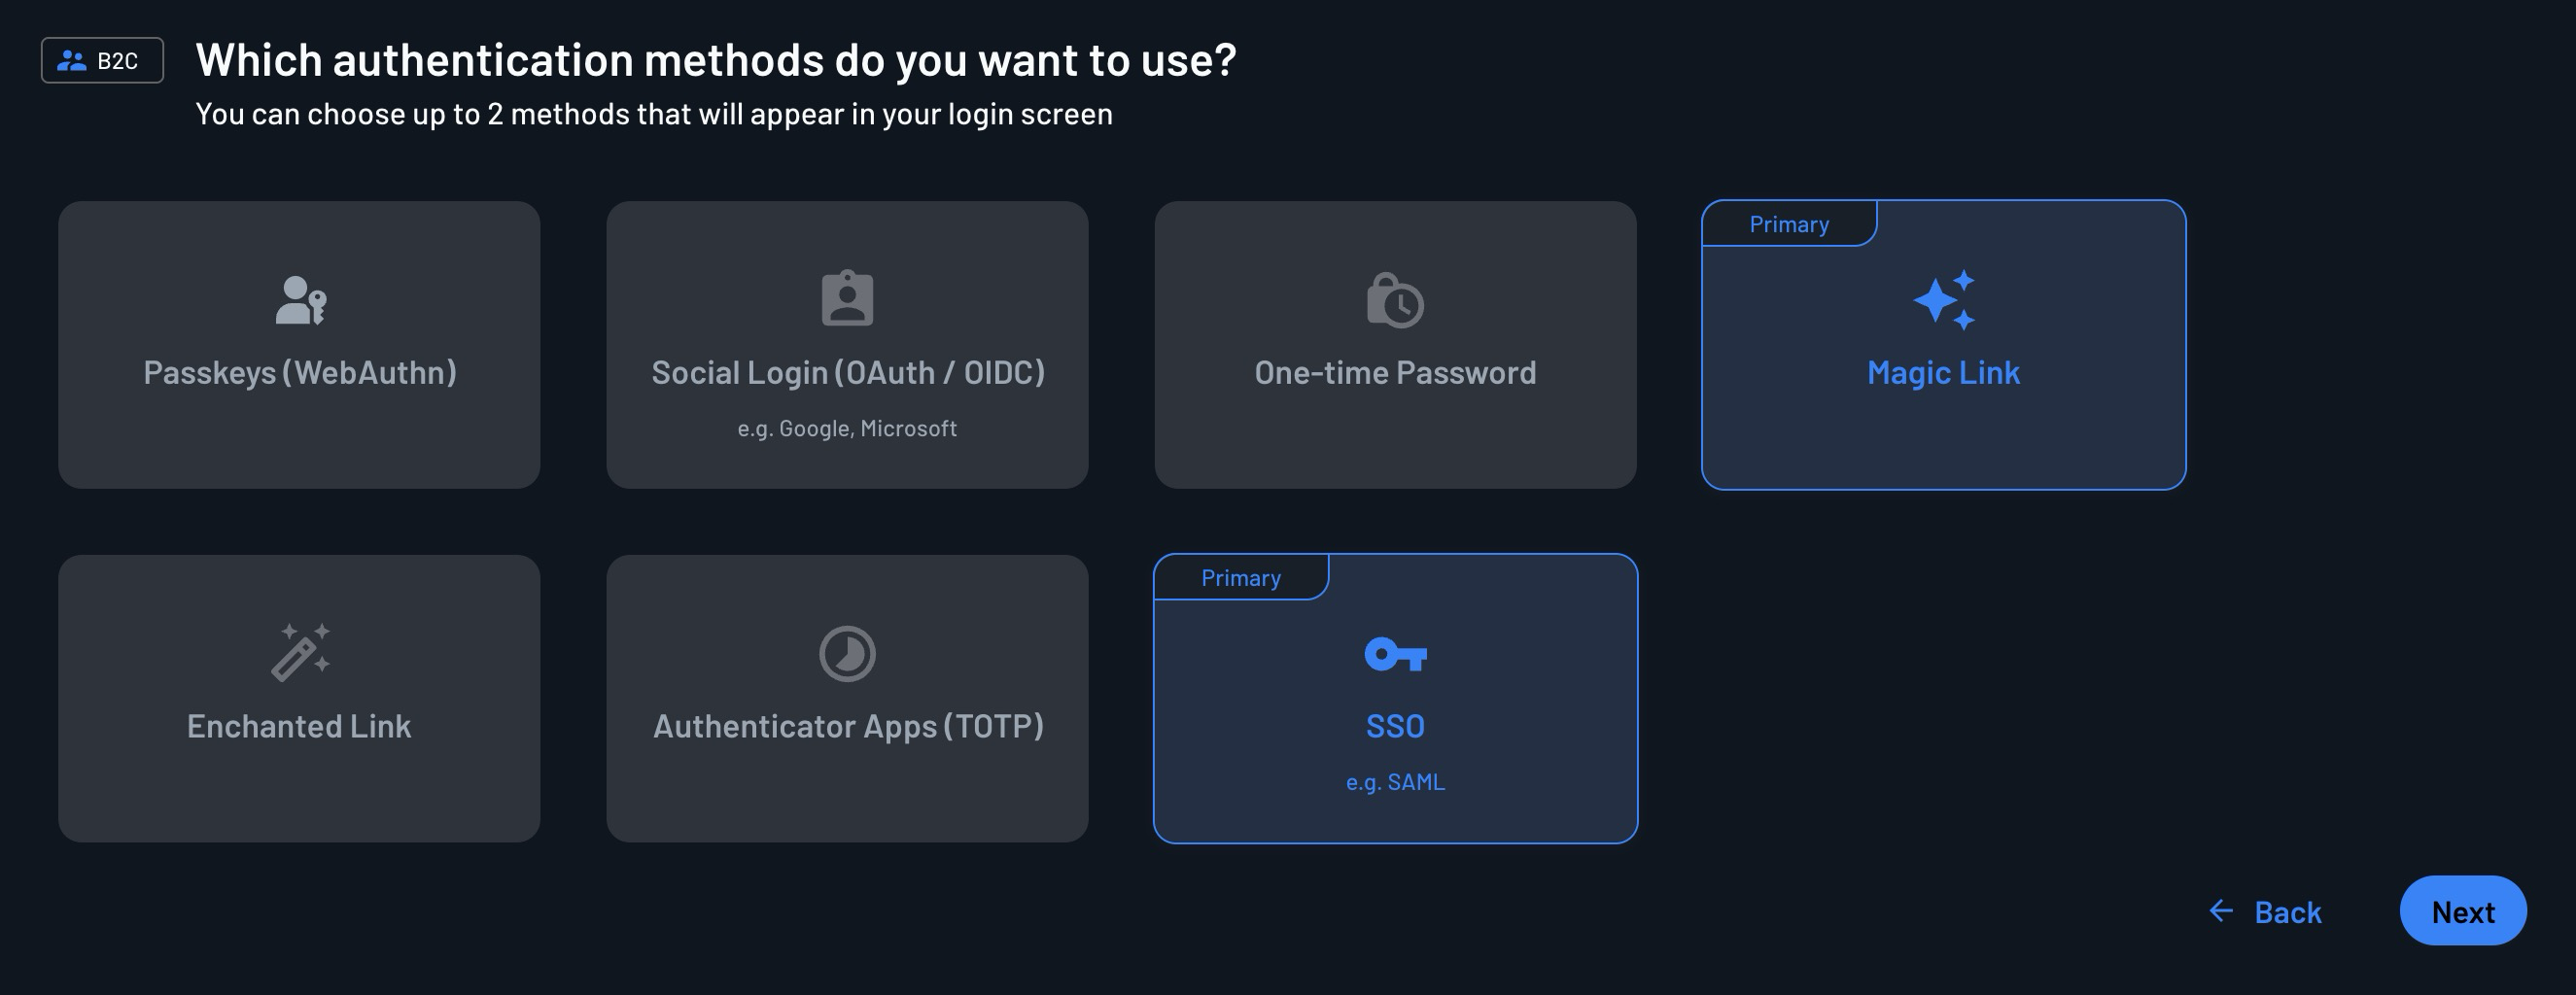
- Then click “go ahead without MFA” - as we don’t need this yet.
- Then click “next”.
- You can play around on this page now to customize how your login screen page looks, but you can always access it later by navigating as per the below instructions.
Customizing the login page
Note: You don’t need to edit the flow Descope has scaffolded for you at all - it will already be perfectly functional. However, I have provided the Flow template sign-up-or-sign-in.json in the repository, which you can import to follow along exactly (since it is customized slightly).
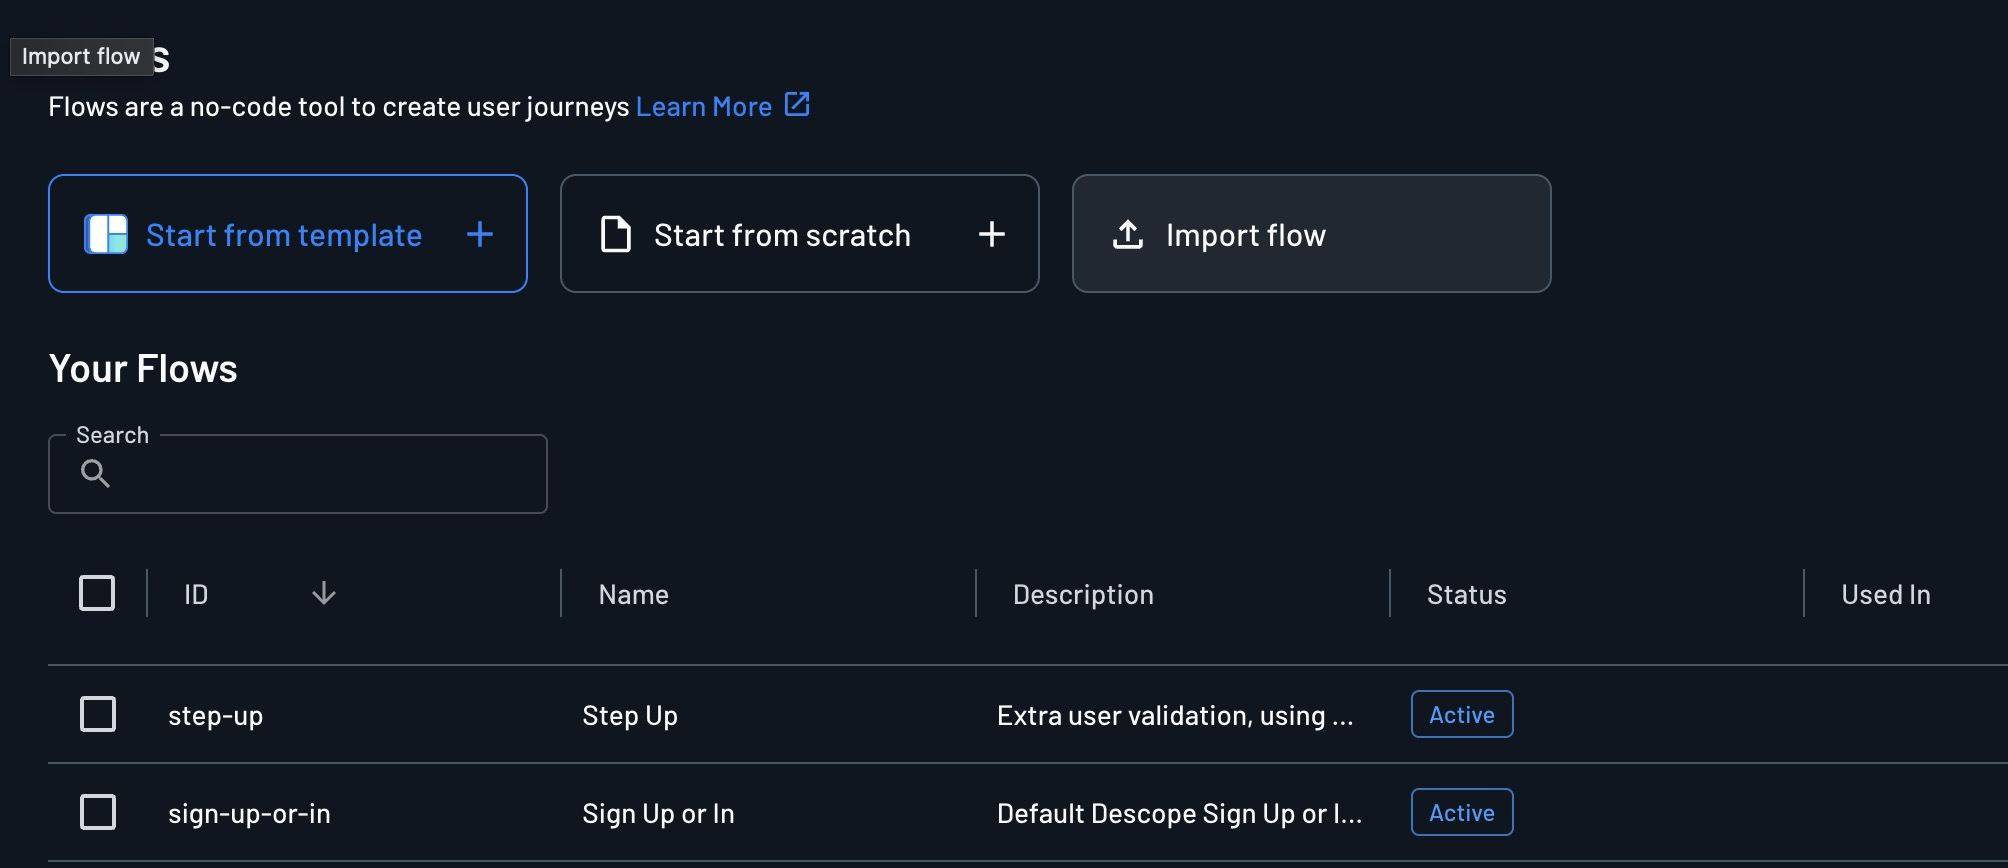
However, here’s how you edit your various flows.
- Go to Build → Flows → Sign up or in
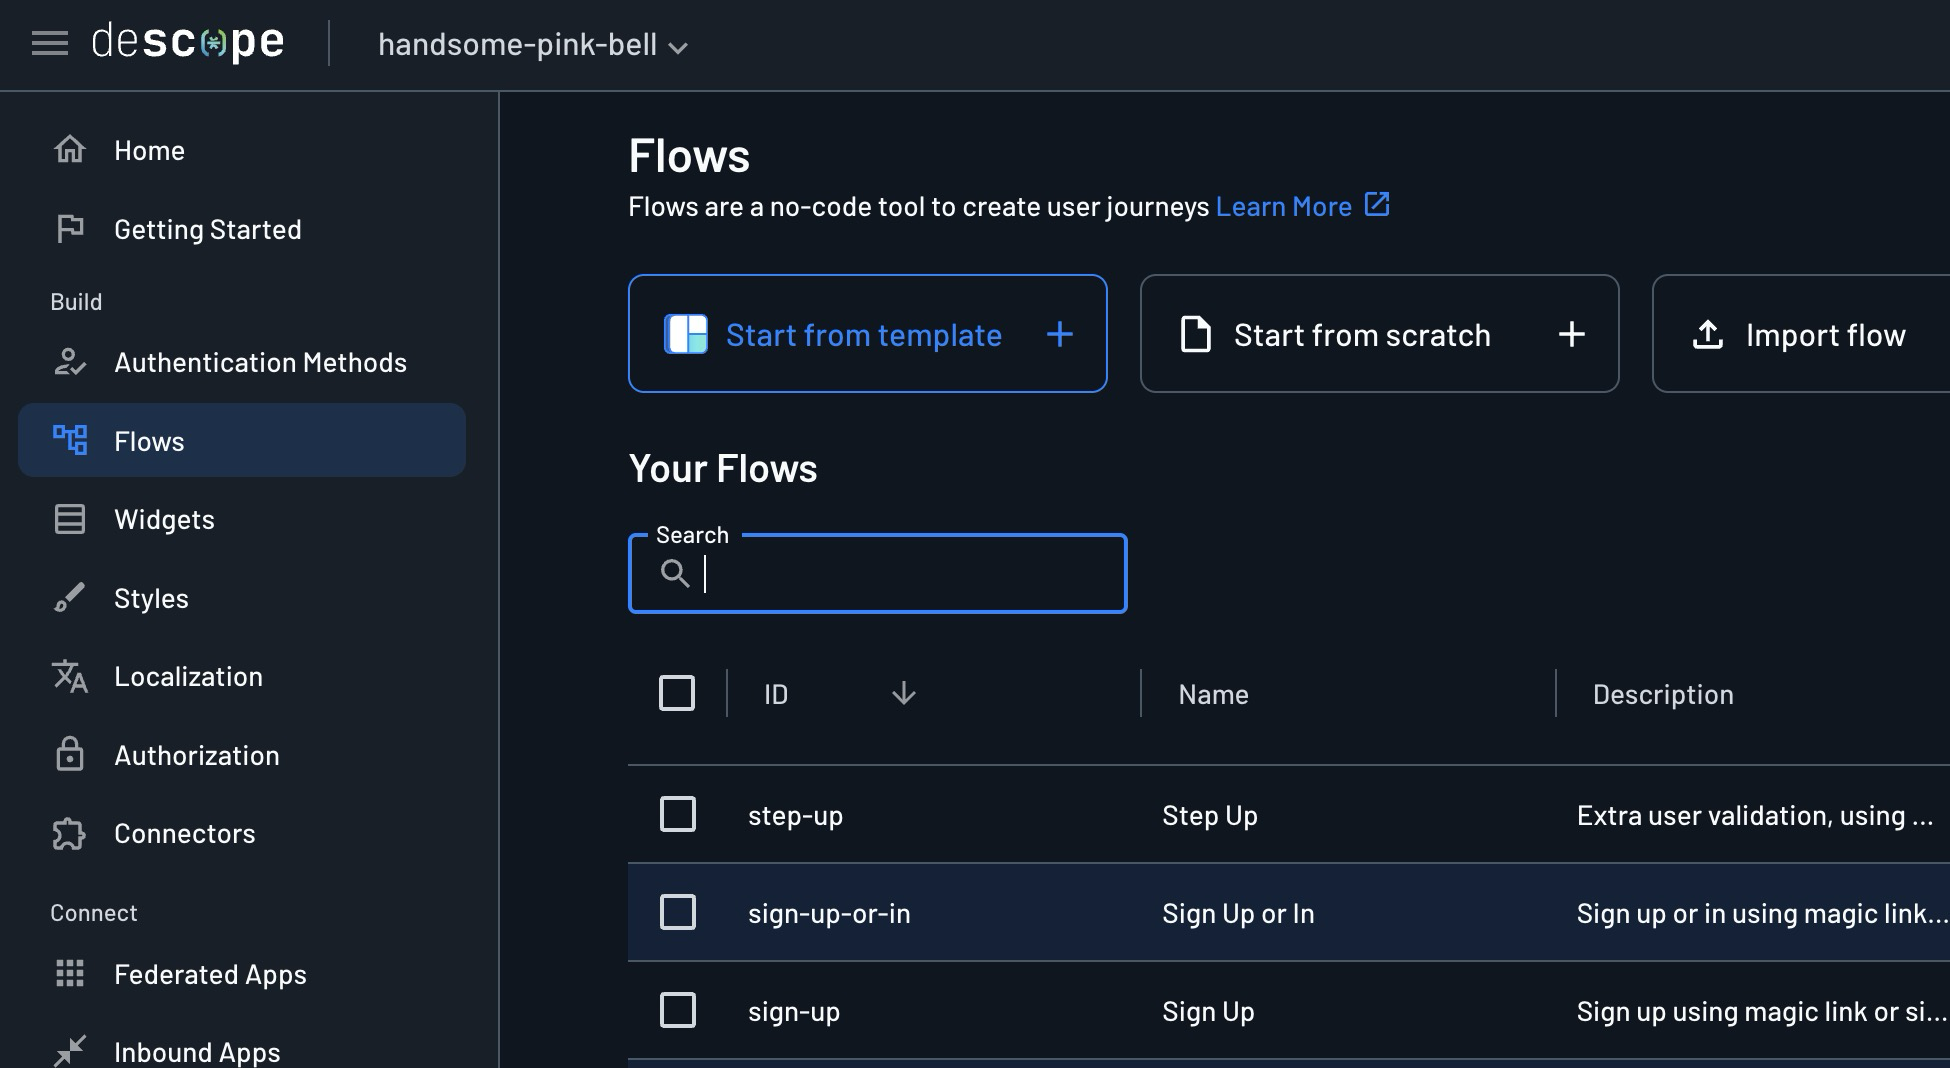
- This is the flow that we will be using for this app. Use cmd + scroll to zoom in, and then click edit on the Welcome Screen.
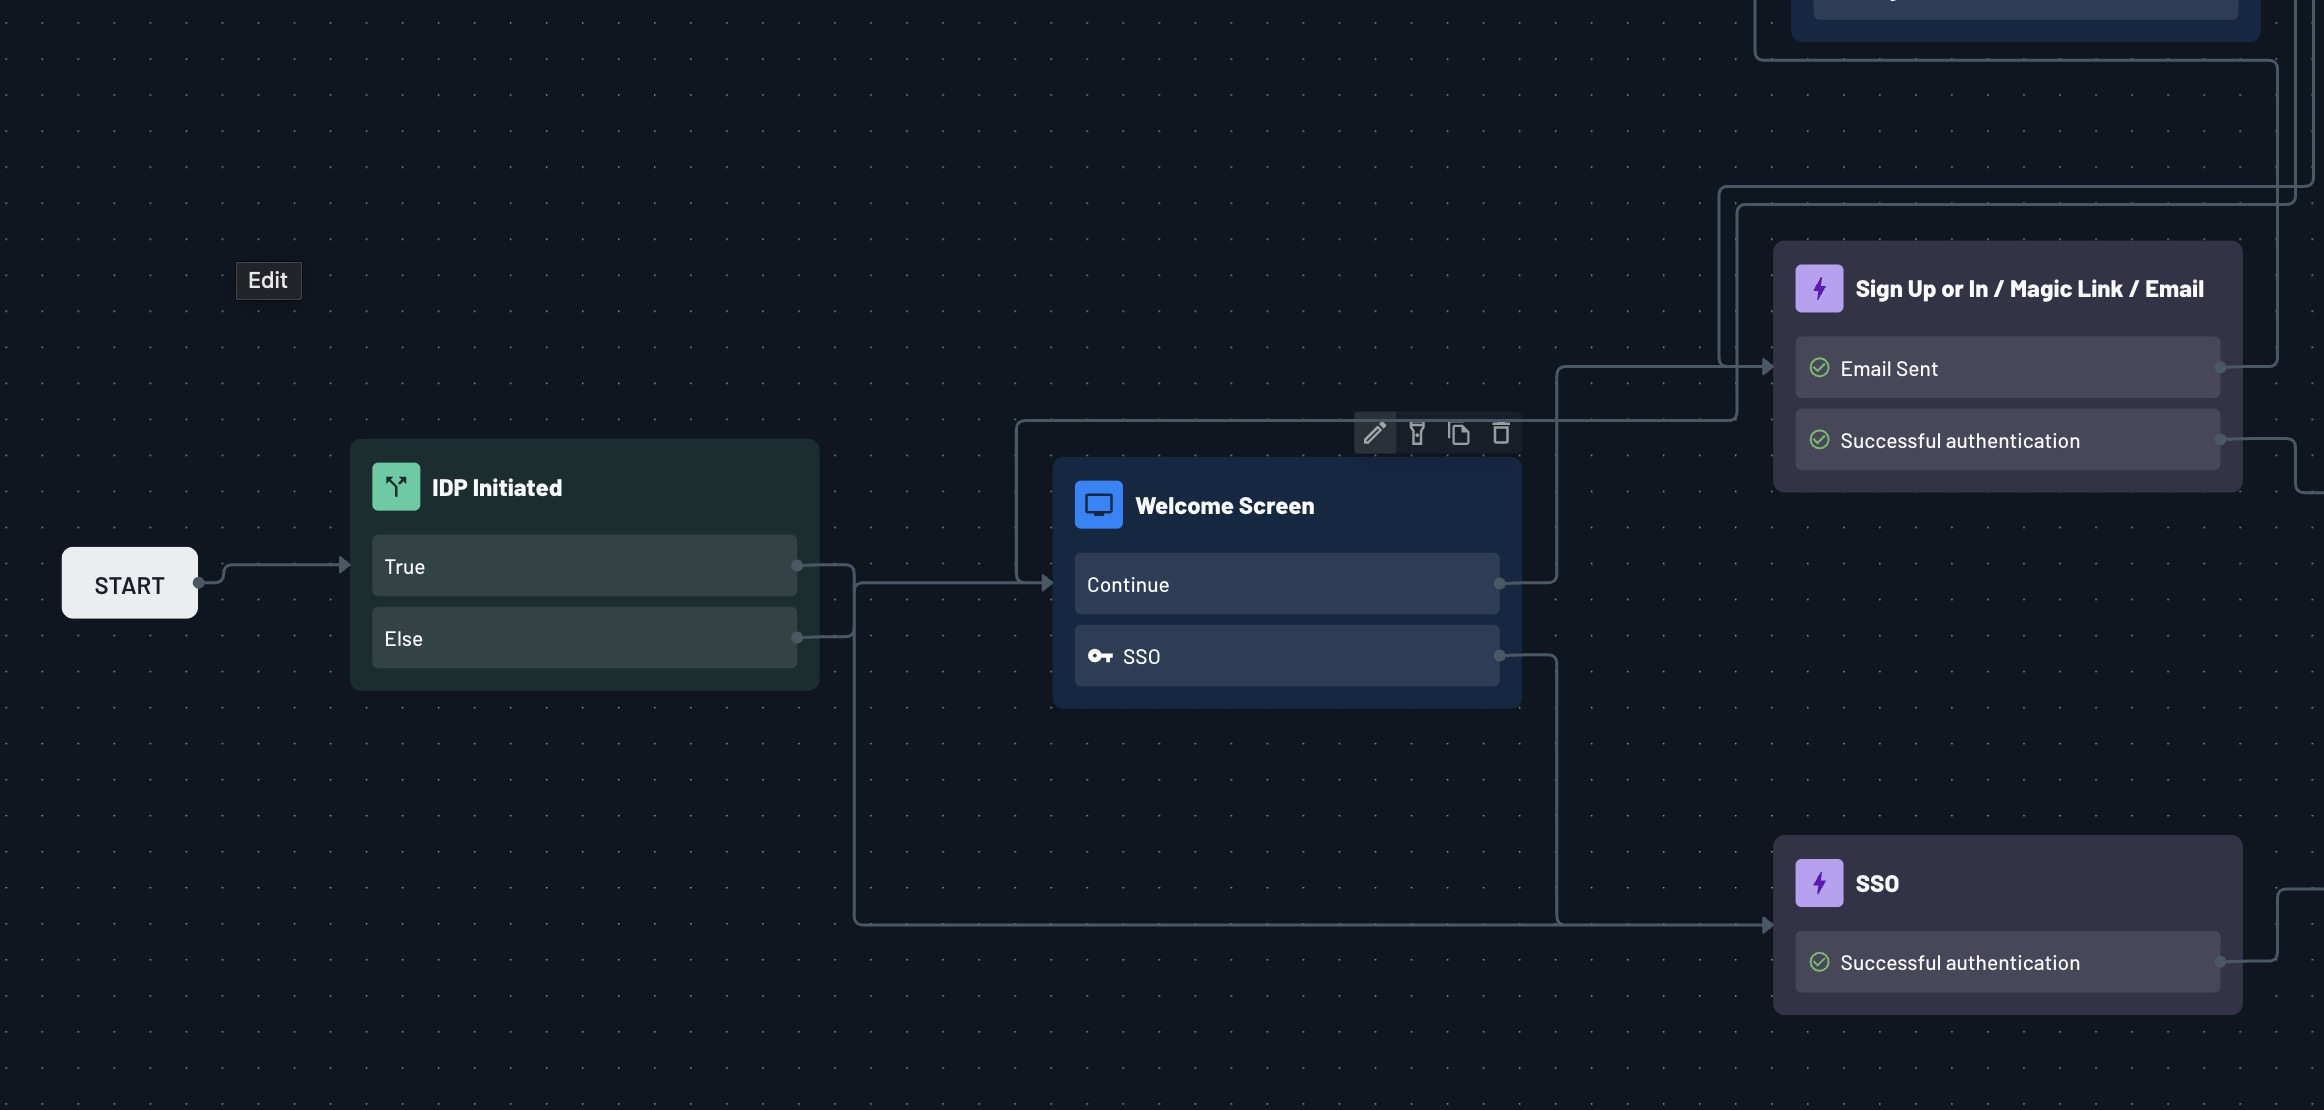
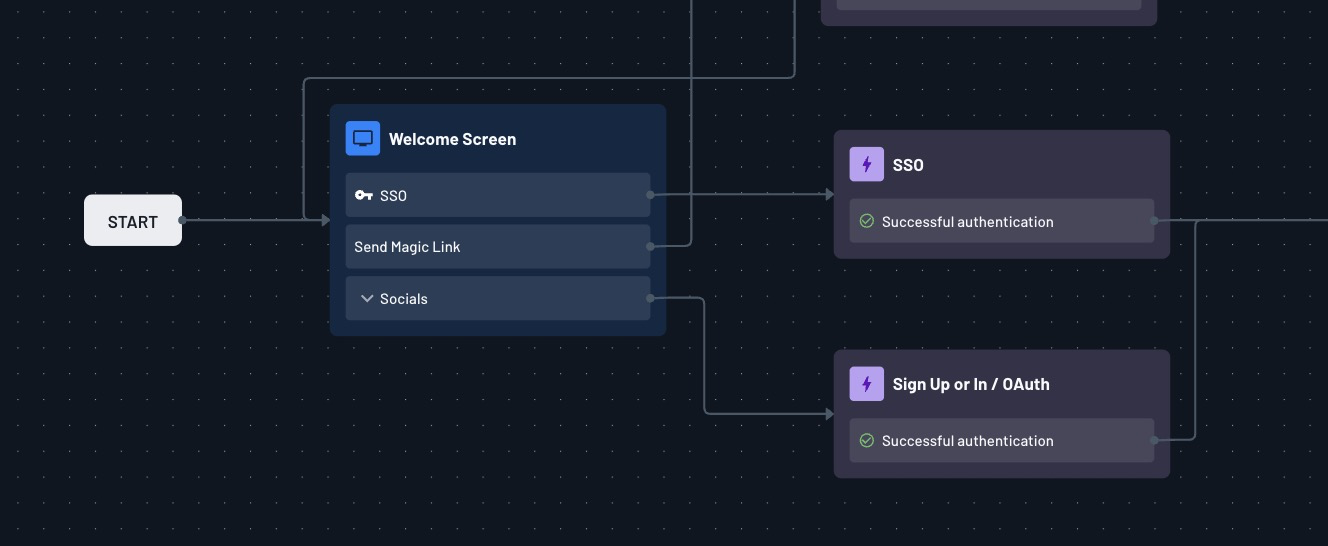
- Here in the editor for the Welcome Screen, you could add a Google login button for example. Then, when you go back to the main flow diagram (see below), click the + button in the top left to add an “action”, and choose the OAuth action. We won’t be implementing this today, but it helps you understand how to use it. However, in the repository there is a sign-up-or-sign-in-with-google-oauth-sample.json which is a Descope Flow you can import to see this in action.
Setting up Descope Authentication in Remix
Now it’s time to use this new sign up/log in flow in our Remix application.
First, go to https://app.descope.com/settings/project and copy the Project ID. Then in your .env file, add PUBLIC_DESCOPE_PROJECT_ID={your_project_id}.
Then install:
npm i --save @descope/react-sdk
Next we need to change our root.tsx file: Here is a snippet of it:
declare global {
  interface Window {
    ENV: {
      PUBLIC_DESCOPE_PROJECT_ID: string;
    };
  }
};

export const loader = async ({ request }: LoaderFunctionArgs) => {
  return json({
    requestInfo: {
      hints: getHints(request),
      userPrefs: {
        theme: getTheme(request),
      },
    },
    //allows you to access these env variables in client using: window.ENV.EXAMPLE_VARIABLE
    ENV: {
      PUBLIC_DESCOPE_PROJECT_ID: process.env.PUBLIC_DESCOPE_PROJECT_ID,
    },
  });
};

export const links: LinksFunction = () => [
  { rel: "stylesheet", href: styles },
  ...(cssBundleHref ? [{ rel: "stylesheet", href: cssBundleHref }] : []),
];

export const meta: MetaFunction = () => {
  return [
    { title: "Remix Auth Descope" },
    { name: "description", content: "Authentication with Remix and Descope" },
  ];
};

export default function App() {
  const data = useLoaderData<typeof loader>();
  const theme = useTheme();
  const nonce = useNonce();

  return (
    <html lang="en" className={clsx(theme)}>
      <head>
        <ClientHintCheck nonce={nonce} />
        <meta charSet="utf-8" />
        <meta name="viewport" content="width=device-width, initial-scale=1" />
        <Meta />
        <Links />
      </head>
      <body>
        <script
          dangerouslySetInnerHTML={{
            __html: `window.ENV = ${JSON.stringify(data.ENV)}`,
          }}
        />
        <ClientOnly>
          <AuthWrapper>
            <Outlet />
          </AuthWrapper>
        </ClientOnly>
        <ScrollRestoration />
        <Scripts />
        <Toaster />
        <LiveReload />
      </body>
    </html>
  );
}
This loads our environment variable through a Remix loader, so that the AuthWrapper component (that is crucially nested under a ClientOnly component) has access to our project id.
Here is the AuthWrapper:
import { AuthProvider, useSession, useUser } from "@descope/react-sdk";
import { Descope } from "@descope/react-sdk";
import { Outlet } from "@remix-run/react";
import { toast } from "~/hooks/use-toast";

export function AuthWrapper({ children }: { children: React.ReactNode }) {
  return (
    <AuthProvider projectId={window.ENV.PUBLIC_DESCOPE_PROJECT_ID ?? ""}>
      <AuthInner>
        <Outlet />
      </AuthInner>
    </AuthProvider>
  );
}

function AuthInner({ children }: { children: React.ReactNode }) {
  const { isAuthenticated, isSessionLoading } = useSession();
  const { isUserLoading } = useUser();

  return (
    <>
      {!isAuthenticated && (
        <div className="flex items-center justify-center min-h-screen bg-gray-100 dark:bg-gray-900 transition-colors">
          <div className="w-full max-w-md p-6 bg-white dark:bg-gray-800 rounded-lg shadow-md dark:shadow-gray-700">
            <Descope
              flowId="sign-up-or-in"
              onSuccess={(e) => console.log(e.detail.user)}
              onError={(e) =>
                toast({
                  title: "Could not log in!",
                  description: "Please try again.",
                  variant: "destructive",
                })
              }
            />
          </div>
        </div>
      )}

      {isAuthenticated && (isSessionLoading || isUserLoading) && (
        <div className="flex items-center justify-center min-h-screen bg-gray-100 dark:bg-gray-900 transition-colors">
          <div className="w-full max-w-md p-6 bg-white dark:bg-gray-800 rounded-lg shadow-md dark:shadow-gray-700 text-center">
            <p className="text-gray-700 dark:text-gray-300">Loading...</p>
          </div>
        </div>
      )}

      {isAuthenticated && !isSessionLoading && !isUserLoading && <Outlet />}
    </>
  );
}
This components displays the 3 different views our user will see depending on whether they are logged in, not logged in, or Descope is loading their session. Since this in the root, this means that when you startup the app now, it will display the Descope Welcome screen.
In the app-sidebar.tsx component, you will notice there is also a useUser() hook from Descope that we use to display user info in the client app.
export function AppSidebar({ ...props }: React.ComponentProps<typeof Sidebar>) {
  const { user } = useUser();
  if (!user.email || !user.name) {
    return <div>Loading...</div>
  }

  const authenticatedUser: AuthenticatedUser = {
    id: user.userId,
    email: user.email,
    name: user.name,
    avatar: user.picture,
  }
  ...
Lastly, in the nav-user.tsx component, I have added a logout button using the useDescope() hook.
import { useDescope } from "@descope/react-sdk"
import { AuthenticatedUser } from "../../lib/auth/auth-types"

export function NavUser({
  user,
}: {
  user: AuthenticatedUser
}) {
  const { isMobile } = useSidebar()
  const { logout } = useDescope()
  const handleLogout = useCallback(() => {
    logout()
  }, [logout])
  ...
That’s it! Now you can sign in with magic link and the home screen will now display your user information in the bottom left.
Lastly, if you want to access the token that Descope has provided your browser (after authenticating), you can access it like so. This example is from https://docs.descope.com/getting-started/react/nodejs.
...
import { getSessionToken } from '@descope/react-sdk';

const App = () => {
  const { isAuthenticated, isSessionLoading } = useSession()
  const { user, isUserLoading } = useUser()

  const exampleFetchCall = async () => {
    const sessionToken = getSessionToken();

    // Example Fetch Call with HTTP Authentication Header
    fetch('your_application_server_url', {
      headers: {
        Accept: 'application/json',
        Authorization: 'Bearer ' + sessionToken,
      }
    })
  }
...
Then, you can pass it in headers to your backend, or whatever else you may need to use it for. Thereafter, it can be verified using the Descope package for your backend. For instance, with Node.js install:
npm i --save @descope/node-sdk
This is out of the scope of this tutorial, but you can read more at: https://docs.descope.com/getting-started/react/nodejs.
Adding OIDC SSO with Descope and Azure
If you logout now, and try to login using the Continue with SSO button, you will notice it fails.
This is because, we need to setup a tenant for SSO in Descope, and then configure the application in Azure.
We are using Azure for this tutorial, but remember this could be done in Okta, Google Cloud etc.
Creating an application in Azure
-
Navigate to https://portal.azure.com/#view/Microsoft_AAD_IAM/AppGalleryBladeV2 to create a new application in Azure.
-
Then click “Create your own application” in the top left, enter the name of the app and be sure to check the 2nd option as per below.
-
redirect uri on next page: https://api.descope.com/v1/oauth/callback
-
Then go to the App Registrations page and click on the app you just created.
-
Then go to the overview tab, and copy the Application (client) ID.
-
Then go to manage → Certificates & Secrets, then create a new client secret and copy the value.
-
Now that you’ve stored the Client ID and secret, go to the Authentication tab directly above Certificates & Secrets, and check the 2 checkboxes - for access and ID tokens respectively. Then enter the Front-channel logout URL https://api.descope.com/oauth2/v1/logout.
-
Now we have set up the app in Azure for our first tenant, but we don’t have the tenant modelled in Descope, so let’s create it.
Make the Descope Tenant
Go to https://app.descope.com/tenants and click the plus to create a new tenant.
Then navigate to the SSO page as indicated below, and select OIDC (Note - you can have OIDC and SAML enabled for a single tenant - so you could follow through this whole tutorial (with minor changes) and use the same tenant in Descope but different tenants in Azure.
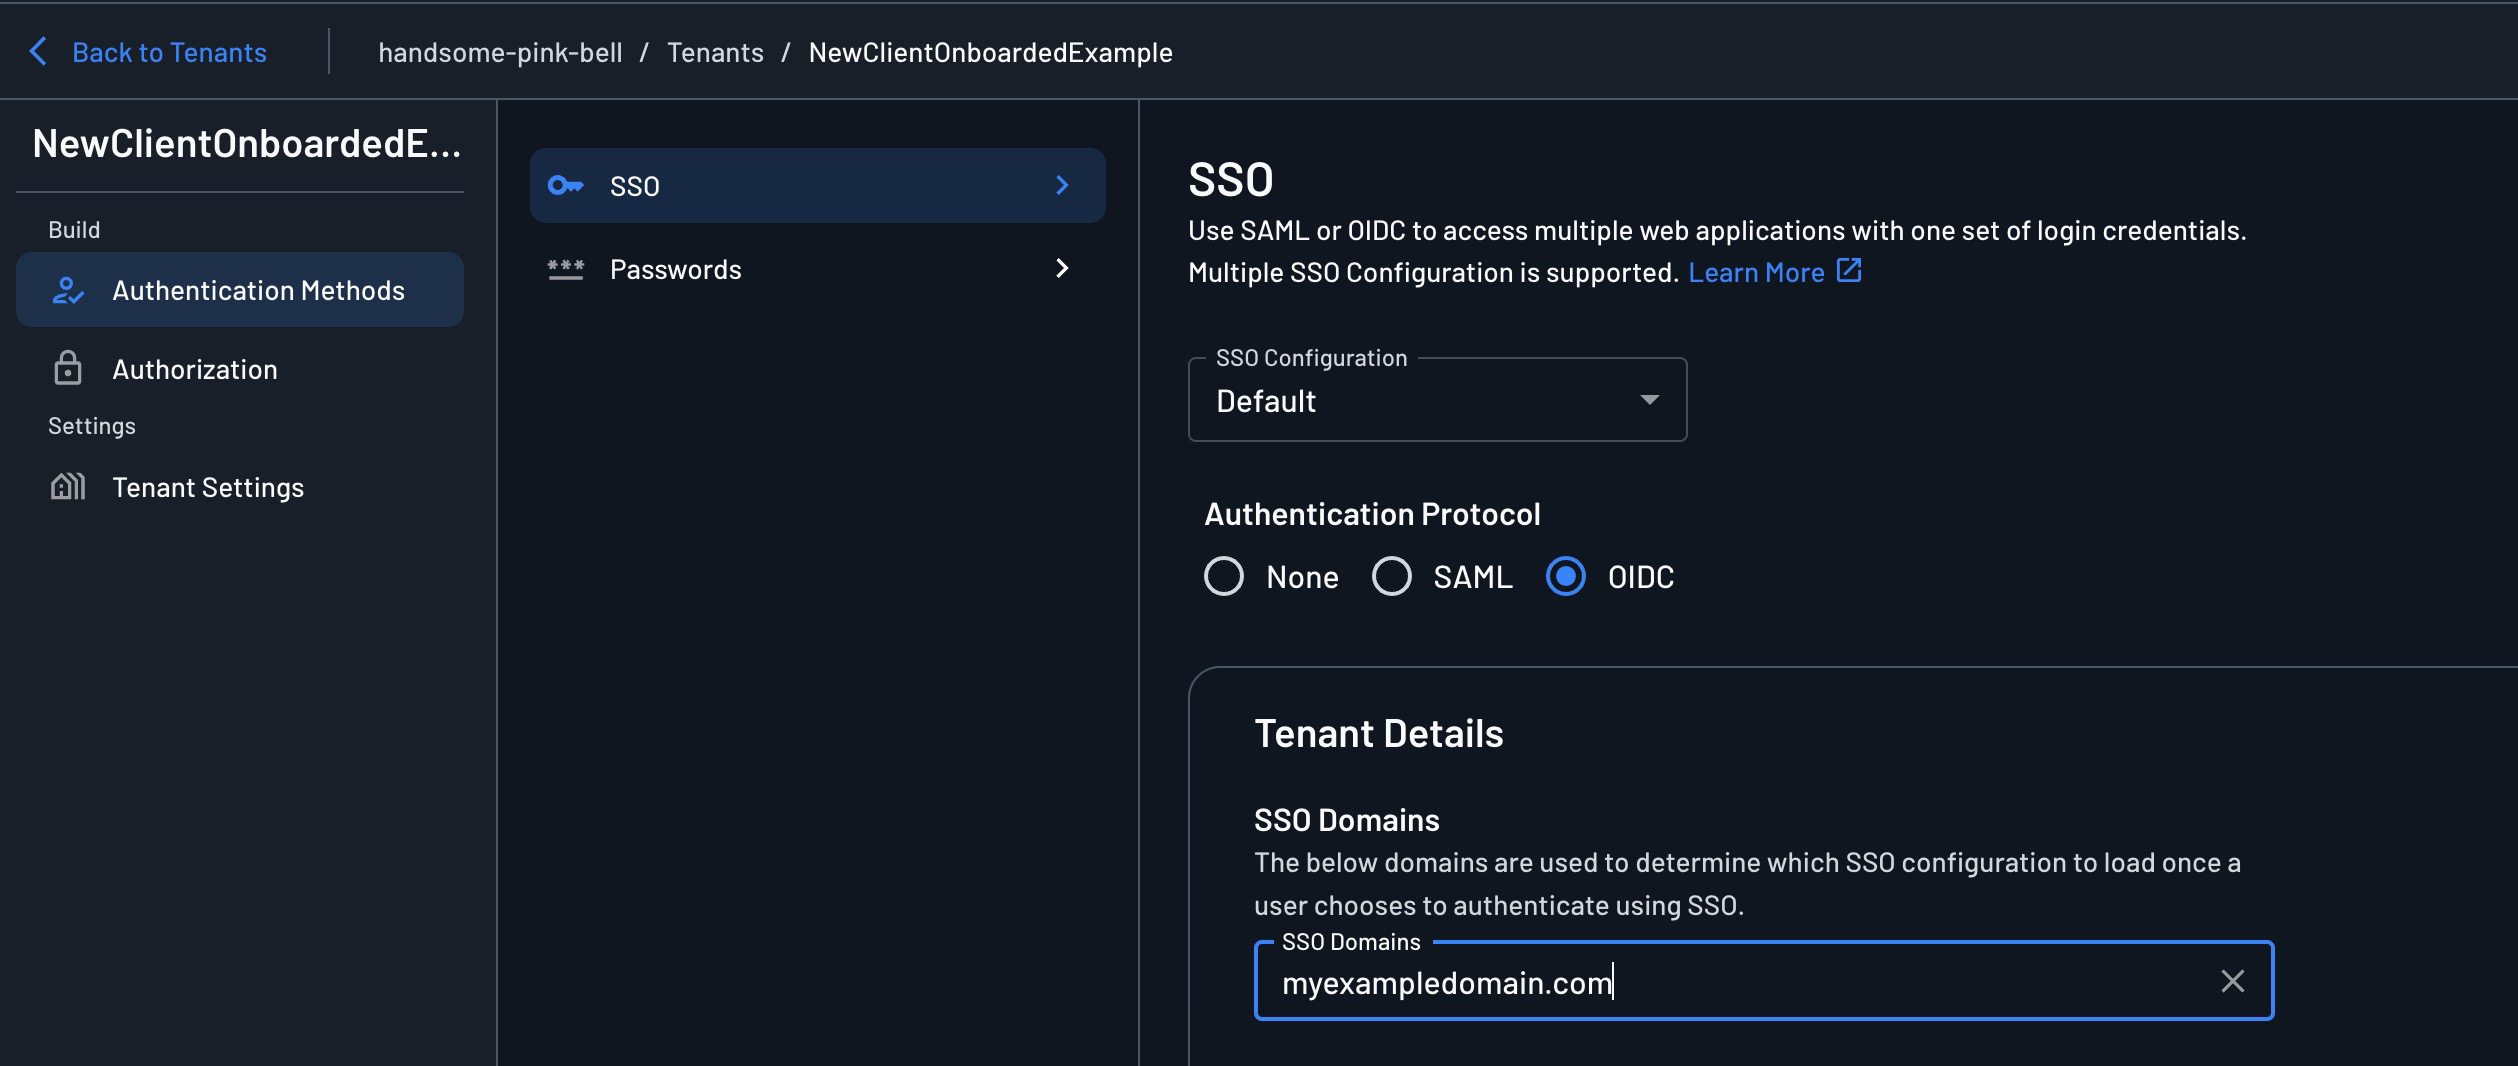
Now scroll down to SSO Configuration and enter in this information under Account Settings.
- Provider Name: Azure
- Client ID: The application (client) ID you saved earlier
- Client Secret: The secret you saved earlier
- Scope:
openid profile email - Grant Type: leave as Authorization code
To fill in the Connections Settings section underneath, you will need to head back to your app in Azure, go the the Overview page again, and click on Endpoints in the tabs along the top.
Now, fill in the remaining values:
- Authorization Endpoint: The value under: OAuth 2.0 authorization endpoint (v2)
- Token Endpoint: The value under: OAuth 2.0 token endpoint (v2)
Then, open the link under OpenID Connect metadata document in a new tab, and check “pretty print” so you can see the fields easier.
Now, you can fill in the last fields.
- Issuer: the value to the right of issuer in the json.
- User Info Endpoint: the value for userinfo_endpoint
Time to test
Now you can head back to the Remix app and make sure you’re logged out (if you logged in with magic link earlier). Then click Sign in with SSO after entering the email associated with the domain of this new tenant you just configured.
If prompted, you will need to accept as per below:
Now you will see your user in the sidebar, and so we’re done!
Adding SAML SSO with Descope and Azure
Now, to create a new SAML app within Azure, you may want to create a new tenant. This is because domains are bound to the tenant, so we can’t have users at different domains with the same tenant within Azure. Here’s how to create a new tenant.
- Navigate to: https://portal.azure.com/#view/Microsoft_AAD_IAM/DirectorySwitchBlade/subtitle/ and create a new tenant to use for this example.
- Choose Microsoft Entra External Id under Basics, and then this is the example domain I will be using under Configuration.
- Then click Create, and switch to the tenant in the top right.
- Now you can create an application as per before with the OIDC SSO implementation at https://portal.azure.com/#view/Microsoft_AAD_IAM/AppGalleryBladeV2, except choose the 3rd option after typing in a name:
-
Go back to Descope and create a new tenant as per the OIDC section above. Remember, we need to make a tenant for each separate source/grouping of users. In this example I am imagining these are employees, and the other tenant we created in Descope earlier being for a client’s users.
-
Then, go to the SSO page as per before, but enable SAML not OIDC. Now enter the domain for this tenant under SSO Domains within Tenant Details at the top of this page.
-
Scroll down to SSO Configuration. Then check Enter the connection details manually. Here’s what it will look like once you have entered all information.
-
Head back to the app registration in Azure, go to Manage → Users and Groups → + Add user/group. Then click on the none selected option. Then select whatever users you want assigned to this tenant.
-
Now go to Manage → Single sign-on, and then scroll down to section 4. Then copy the values for Login Url, and Microsoft Entra Identifier, and paste them into the respective sections in Descope.
- SSO (Single Sign-On) URL: Login Url
- Entity ID: Microsoft Entra Identifier
-
To enter the Certificate, click download next to Certificate (Based64) and open it in a text editor. If you’re on a Mac, you may need to head to Settings → Privacy and Security, and scroll down to Security and check “Open Anyway”. Then copy the text and paste it into the Certificate input in Descope.
- Finally, scroll down in Descope to the section under Service Provider. Now head back to Azure, and ****scroll back up to section 1 on this same page, and click on Edit.
- For: Identifier (Entity ID) paste in the value for Descope Entity ID (not required by all providers) from Descope.
- For: Reply URL (Assertion Consumer Service URL) paste in the value copied from Descope ACS URL in Descope.
SSO Mapping for SAML SSO
The last thing we need to do is SSO mapping, this will ensure that Descope and our app can access attributes we might care about for our users - for example: assigned groups, roles, name, email etc. The SAML protocol does not contain something like a user info endpoint (like we provided earlier with OIDC) so we need to map this manually.
-
Go back to the Single sign-on page under Manage (that you were on earlier) and click Edit under section 2 (Attributes & Claims).
-
Ensure that you have at least the below claims:
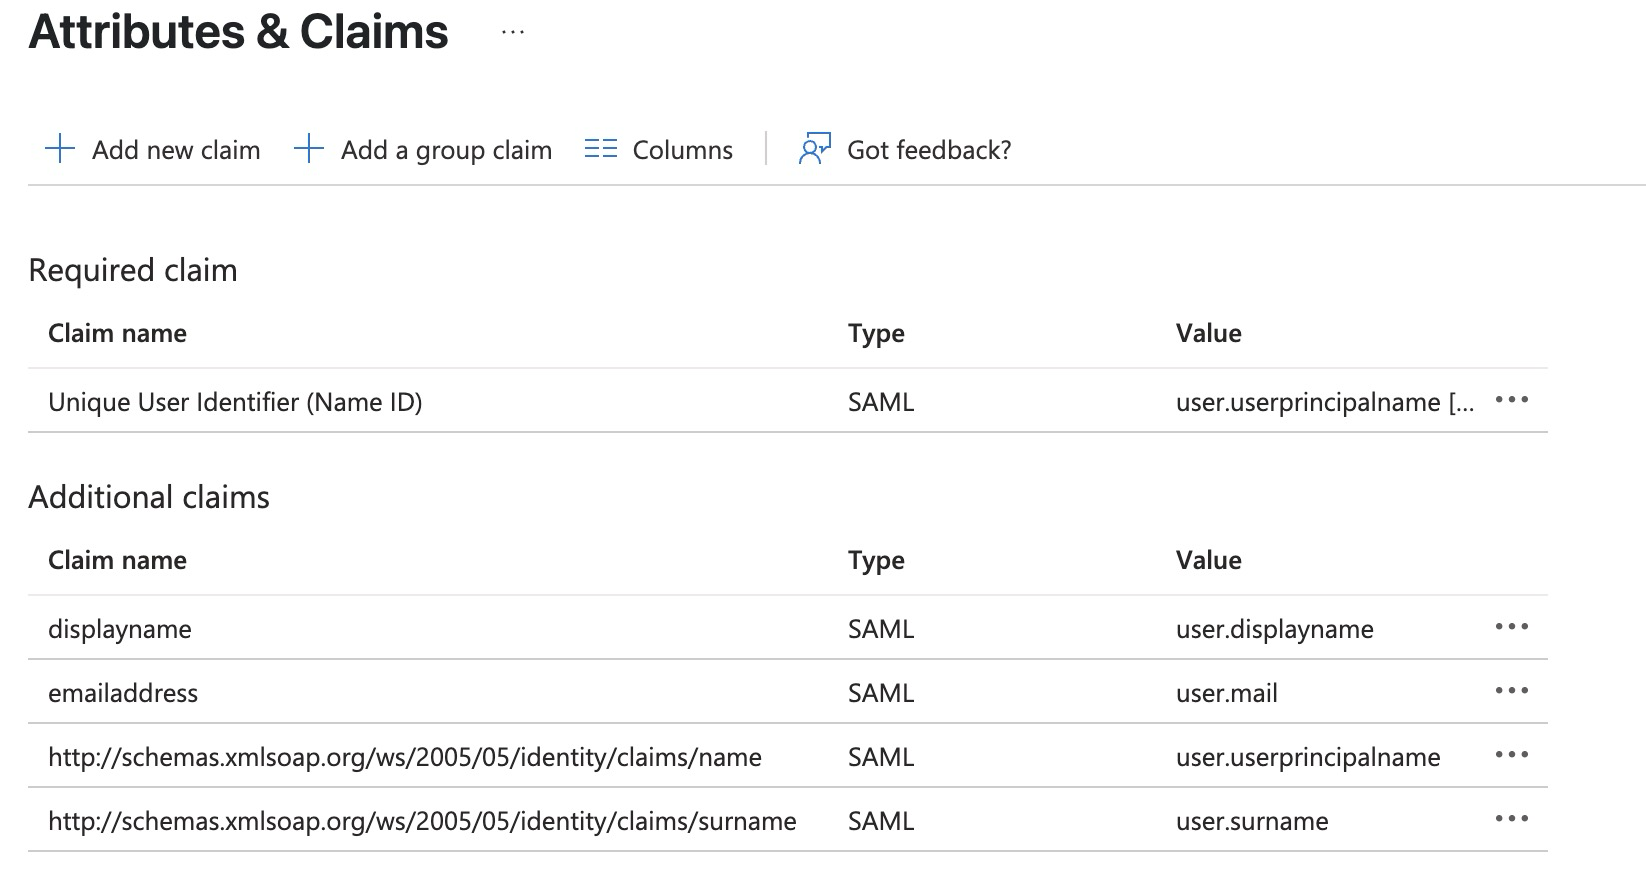
For instance, this is how the displayname claim would like when clicking edit:
-
Go back to Descope, and scroll down on the same SSO page until you reach the section for SSO Mapping. Enter these two mappings.
Testing time
That’s it - now you can login with SSO in the Remix app again, but make sure to use a user you have selected for this new tenant. If you see your name in the bottom left in the Remix app after logging in, you can be sure SSO mapping and other SAML configuration you entered was correct!
Optionally, you can head to https://app.descope.com/users and click edit on a user to confirm it was assigned to the correct tenant after logging in.
Conclusion
After reading this article, you should have a good understanding of:
- Why SSO is useful (and what it is)
- Securing pages (and possibly other APIs) in your Remix app.
- How to configure app registrations in Azure for OIDC and SAML
- How to configure Remix for OIDC, SAML and magic link login
We have also explored the Descope Flow editor just enough for you to get a grasp of what is possible, and how you could begin to string together more advanced flows (think asking the user for MFA confirmation, filling out forms before signing up, the list deca_0.png
More writing
Comparing the best AI Agent Frameworks (and which one you should pick)
Chances are you’re reading this article because you’ve been thrown around the hype of the internet searching for the best way to build an AI agent.
How to Deploy Your App to Kubernetes with Free and Automatic SSL
By the end of this article you’ll have the tools at your disposal to deploy however many apps and services your heart desires, completely for free with automatic SSL to your shiny k8s cluster.